05.Git学习笔记–搭建企业私有Git服务
Git 服务器搭建方式
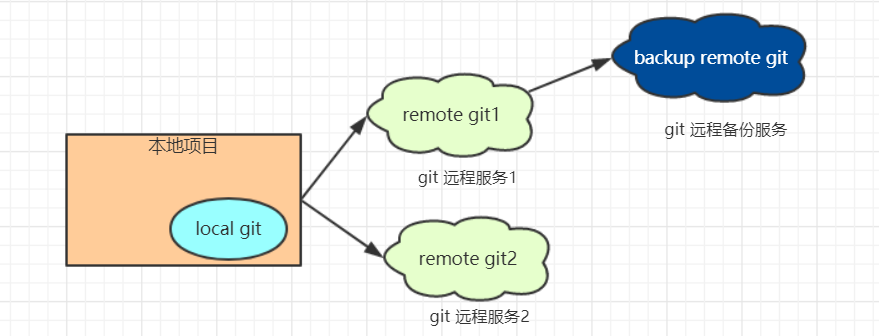
Git 支持的四种通信协议
- Local(本地协议)
- SSH
- HTTP(Dumb, Smart)
- Git
Local(本地协议)
基于本地文件系统或共享(NFS)文件系统进行访问。
优点:简单,直接使用了现有的文件权限和网络访问权限,小团队小项目建立一个这样的版本管理系统是非常轻松的一件事。
缺点:这种协议缺陷就是本身共享文件系统的局限,只能在局域网,而且速度也慢。
适应场景:小团队,小项目临时搭建版本服务。
实例
搭建及使用
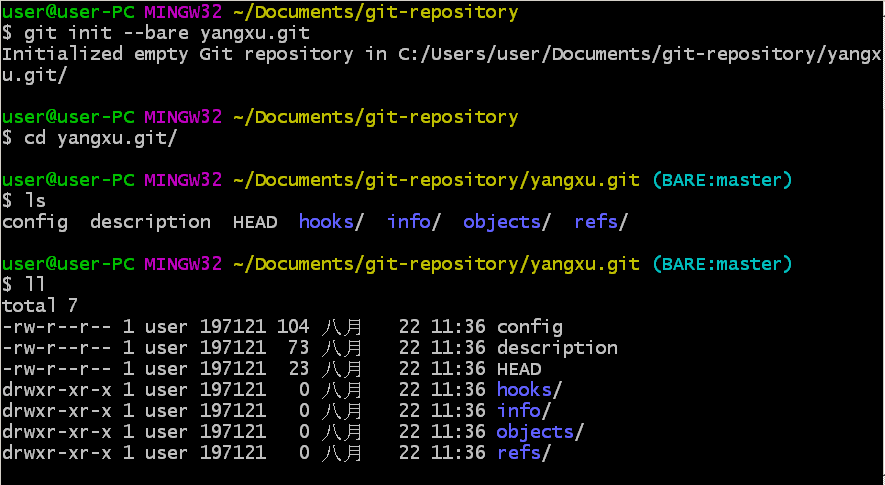
建立一个裸仓库
git init --bare yangxu.git
cd yangxu.git/
ls
ll
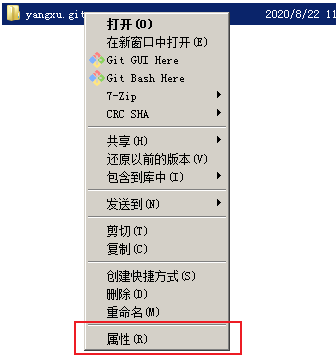
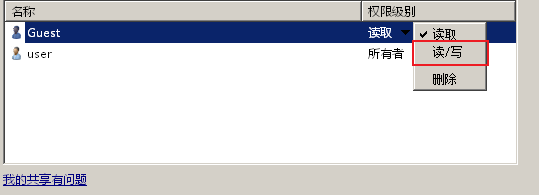
将 yangxu.git 进行共享
1、右键 –> 属性
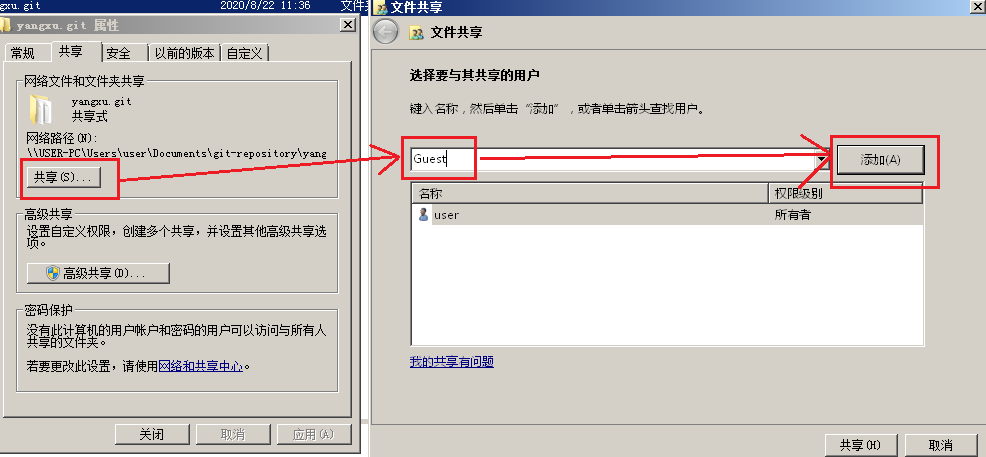
2、共享 –> 填写用户 Guest –> 添加
3、修改权限为 读/写
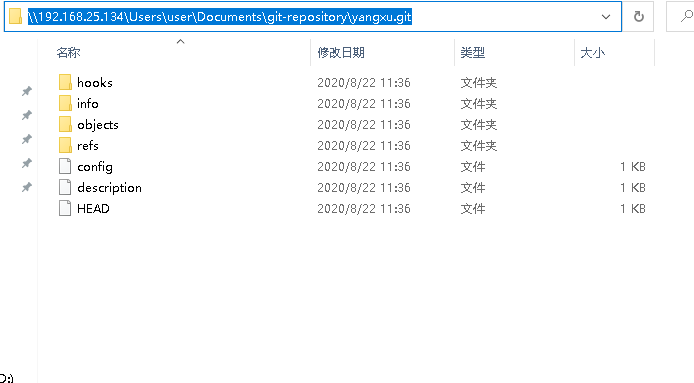
Windows 下访问路径为:
\\192.168.25.134\Users\user\Documents\git-repository\yangxu.git
Linux 下网络路径为:
//192.168.25.134/Users/user/Documents/git-repository/yangxu.git
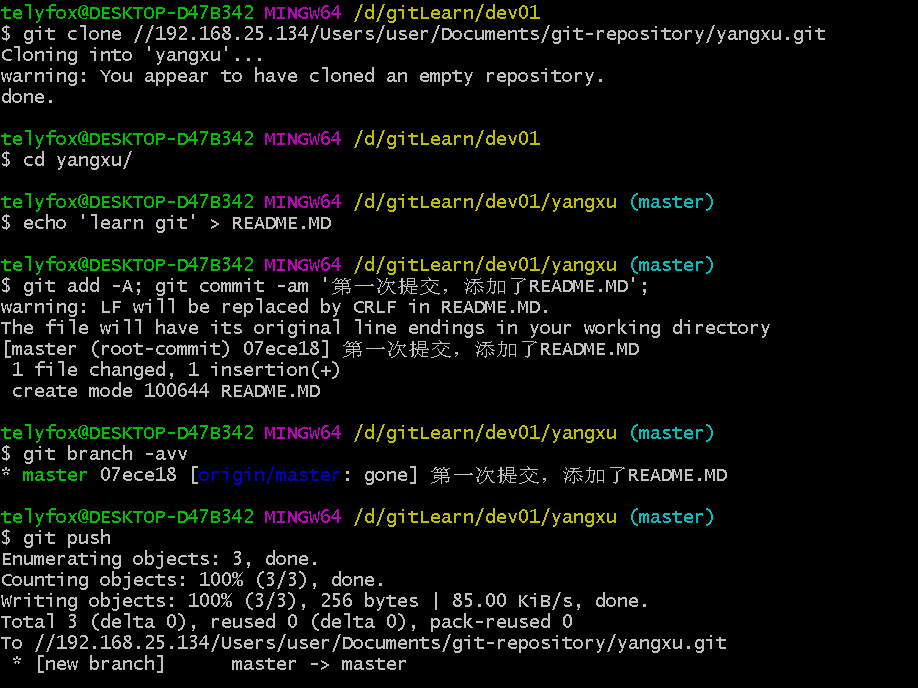
#第一名开发者
git clone //192.168.25.134/Users/user/Documents/git-repository/yangxu.git
cd yangxu/
echo 'learn git' > README.MD
git add -A; git commit -m '第一次提交,添加了README.MD';
#不需要使用 git remote add
#因为使用 git clone 已经与远程仓库建立了关联
#可以使用 git branch 查看与远程仓库的关联信息
git branch -avv
#提交到远程仓库
git push
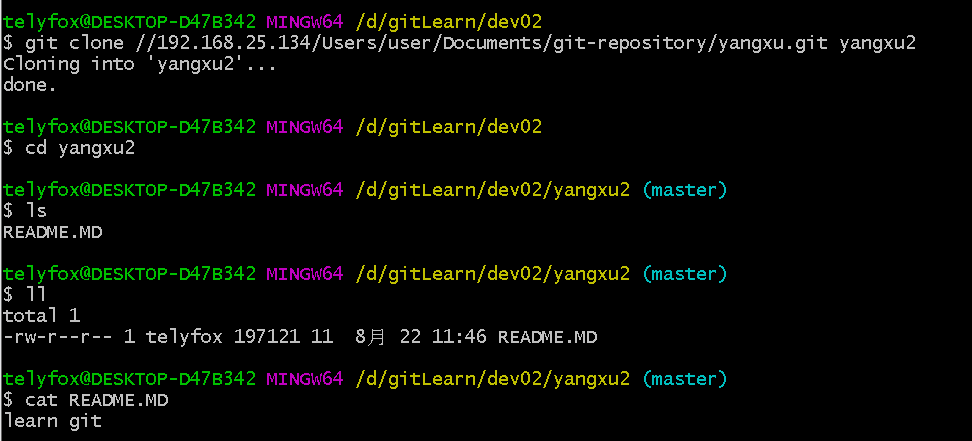
#第二名开发者
git clone //192.168.25.134/Users/user/Documents/git-repository/yangxu.git yangxu2
cd yangxu2
ls
ll
#第三名开发者
git clone file:////192.168.25.134/Users/user/Documents/git-repository/yangxu.git yangxu3
#写成这种形式也可以
git clone file://192.168.25.134/Users/user/Documents/git-repository/yangxu.git yangxu3
cd yangxu3
cd .git/objects/
ll
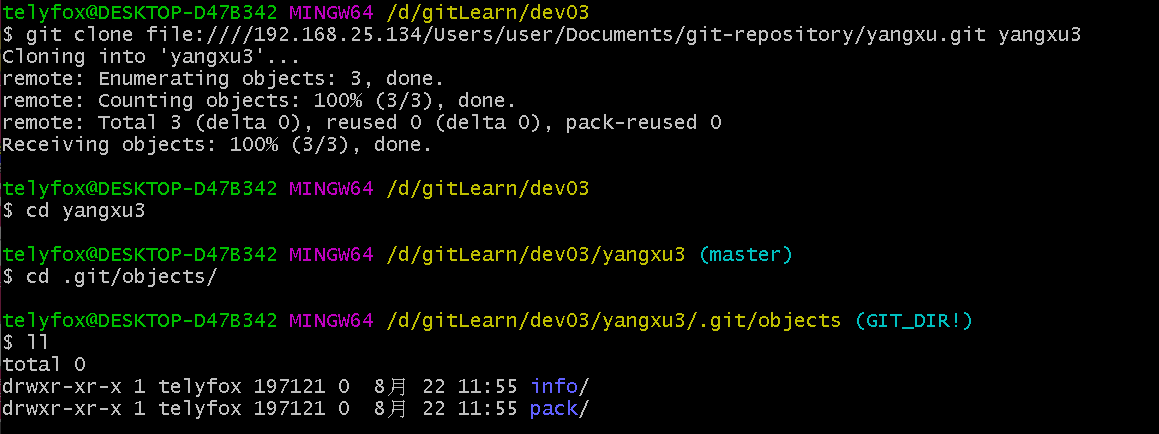
如果在 URL 开头明确地指定 file://,那么 Git 的行为会略有不同。如果仅是指定路径,Git 会尝试使用硬链接(hard link)或直接复制所需要的文件。 如果指定 file://,Git 会触发用于网路传输资料的进程,传输过来的是打包好的文件,更节约硬盘空间。
相当于执行了 git gc 操作。
与 yangxu2 进行对比:


git-gc
参考:
https://git-scm.com/docs/git-gc
#Cleanup unnecessary files and optimize the local repository
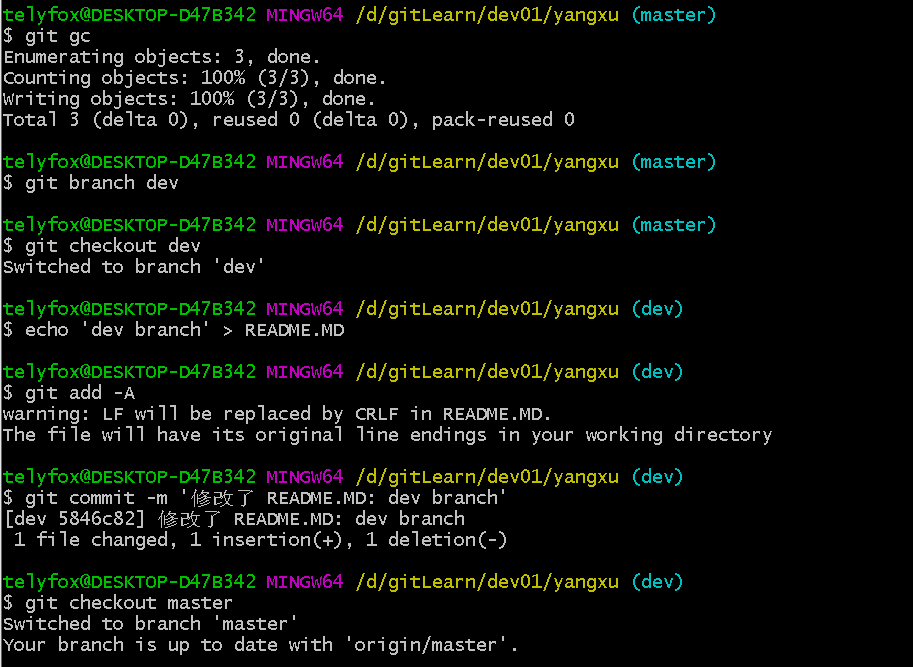
git gc
git branch dev
git checkout dev
echo 'dev branch' > README.MD
git add -A
git commit -m '修改了 README.MD: dev branch'
git checkout master
#删除dev分支
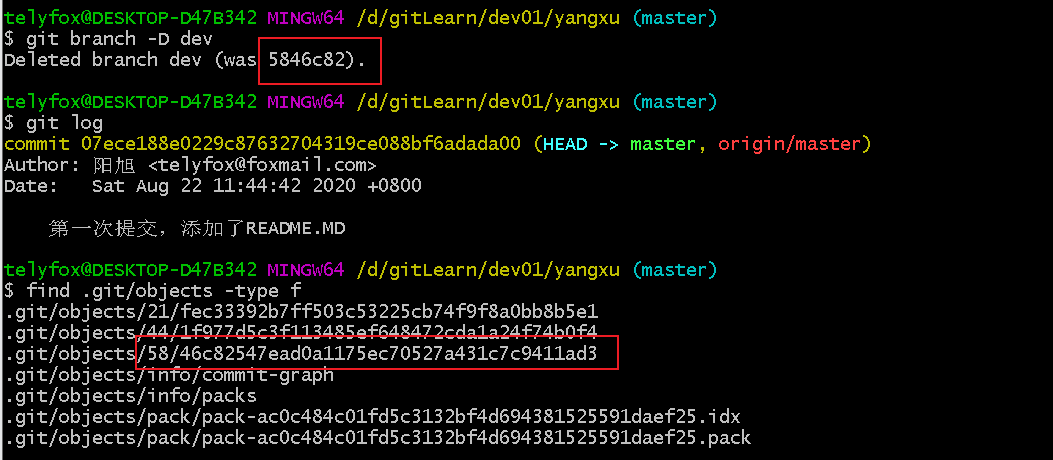
git branch -D dev
git log
find .git/objects -type f
#与 dev 分支相关联的文件还存在
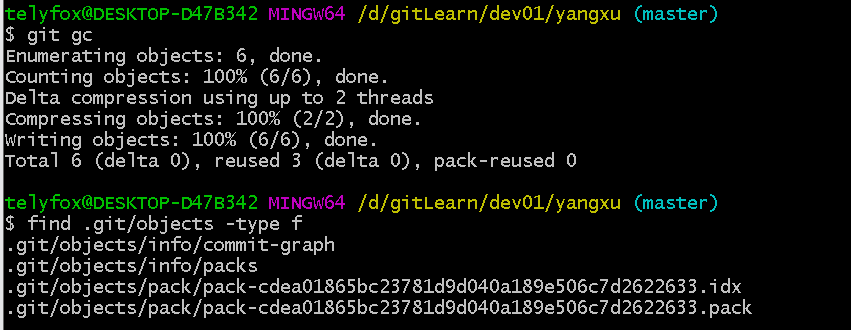
git gc
find .git/objects -type f
# gc 将数据进行压缩打包,并清除了不必要的文件
SSH 协议
SSH 为 Secure Shell 的缩写,由 IETF 的网络小组(Network Working Group)所制定;SSH 为建立在应用层基础上的安全协议。
Git 支持支持利用 SSH 协议进行通信,这是绝大部分 Linux、Unix 系统都支持的,所以利用该协议架设 Git 版本服务非常方便。
优点:SSH 架设相对简单,通过 SSH 访问是安全的,另外SSH 协议很高效,在传输前也会压缩数据。
缺点:权限体系不灵活,必须提供操作系统的帐户密码,哪怕是只读版本。
适应场景:小团队、小项目、临时项目。
实例
搭建及使用
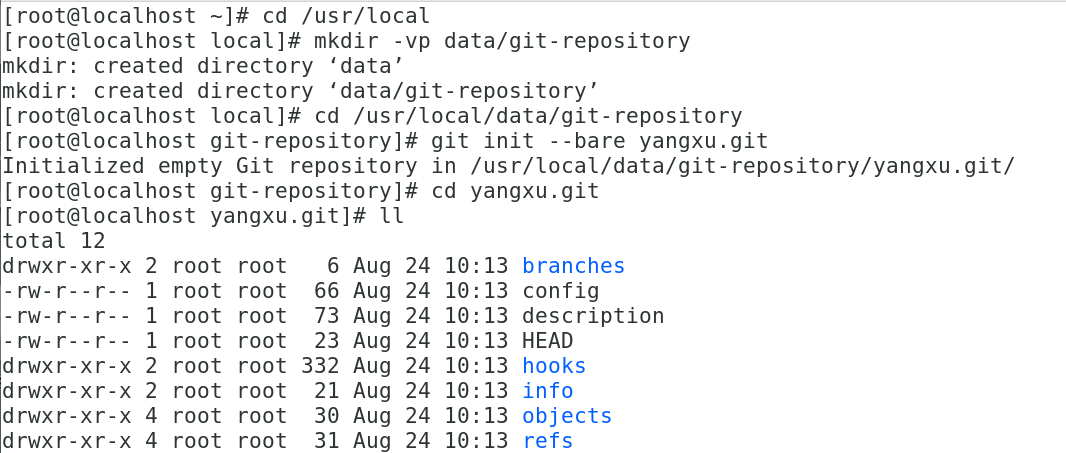
CentOS 7 服务端
cd /usr/local
mkdir -vp data/git-repository
cd /usr/local/data/git-repository
git init --bare yangxu.git
cd yangxu.git
ll
Windows 客户端
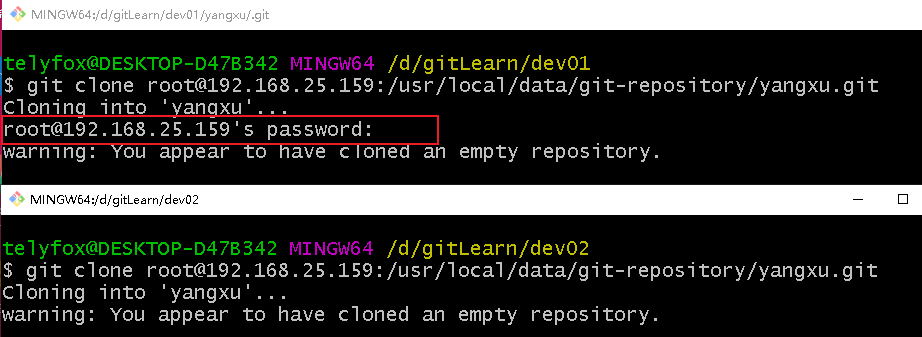
git clone root@192.168.25.159:/usr/local/data/git-repository/yangxu.git

配置公钥
Windows 客户端
#生成公钥和私钥
#默认生成的是OPENSSH PRIVATE KEY
ssh-keygen -C "email"
#生成RSA PRIVATE KEY
ssh-keygen -m PEM -t rsa -b 4096 -C "email" -f ~/.ssh/id_rsa_work

#获取公钥
cat ~/.ssh/id_rsa.pub
公钥看起来是这样的:
$ cat ~/.ssh/id_rsa.pub
ssh-rsa AAAAB3NzaC1yc2EAAAABIwAAAQEAklOUpkDHrfHY17SbrmTIpNLTGK9Tjom/BWDSU
GPl+nafzlHDTYW7hdI4yZ5ew18JH4JW9jbhUFrviQzM7xlELEVf4h9lFX5QVkbPppSwg0cda3
Pbv7kOdJ/MTyBlWXFCR+HAo3FXRitBqxiX1nKhXpHAZsMciLq8V6RjsNAQwdsdMFvSlVK/7XA
t3FaoJoAsncM1Q9x5+3V0Ww68/eIFmb1zuUFljQJKprrX88XypNDvjYNby6vw/Pb0rwert/En
mZ+AW4OZPnTPI89ZPmVMLuayrD2cE86Z/il8b+gw3r3+1nKatmIkjn2so1d01QraTlMqVSsbx
NrRFi9wrf+M7Q== schacon@mylaptop.local
CentOS 7 服务端
ssh-keygen
cd ~/.ssh/
#添加客户端的公钥
vim authorized_keys
#根据需要修改sshd_config
#此步骤可省略,保持默认即可
vim /etc/ssh/sshd_config
#修改权限
chmod 0755 /root
chmod 700 /root/.ssh
chmod 600 /root/.ssh/authorized_keys
配置成功后就不需要输密码了。
提交
cd yangxu
echo 'learn git' > README.MD
git add -A; git commit -m '第一次提交,添加了README.MD';
git push
HTTP (Dumb, Smart)
Git HTTP 协议实现是依懒 WEB 容器 (Apache、Nginx) 及 CGI 组件进行通信交互,并利用 WEB 容器本身权限体系进行授权验证。在 Git 1.6.6 前只支持 HTTP Dumb(哑)协议,该协议只能下载不能提交,通常会配合 SSH 协议一起使用,SSH 分配提交帐号,HTTP Dumb 提供只读帐号。1.6.6 之后 Git 提供了 git-http-backend 的 CGI 用于实现接收远程推送等功能。
优点:解决了 Local 与 SSH 权限验证单一的问题,可基于 HTTP URL 提供匿名服务,从而可以放到公网上。而 Local 与 SSH 是很难做到这一点,比如实现一个类似 GitHub 这样的网站。
缺点:架设相对复杂,需要部署 WEB 服务器以及完成 HTTPS 证书之类的配置。
场景:大型团队、需要对权限精准控制、需要把服务部署到公网上。
注:HTTP Smart 协议是基于 CGI 配合 Git git-http-backend 脚本进行使用,配置较复杂,现在一般不会这么去做,而是采用 GitLab、Gogs 之类的 Web 管理进行代替。
实例
配置及使用
CentOS 7 服务端
cd /usr/local/data/git-repository/yangxu.git/hooks/
#打开钩子
cp post-update.sample post-update
#更新辅助信息文件
#Dumb server basically means accessed over HTTP.
#So if you access your Git repository over http: or https: URLs
#you need the update-server-info business
#otherwise (git:, ssh:, etc.) you don't need it
git update-server-info

只有生成了 packs 才能在客户端进行访问。
cd /usr/local/nginx/conf/
#备份配置文件
tar -zcvf  nginx.conf.tar.gz  nginx.conf
vim nginx.conf
配置 nginx.conf,参考如下:
user  root;
worker_processes  1;

#error_log  logs/error.log;
#error_log  logs/error.log  notice;
#error_log  logs/error.log  info;

#pid        logs/nginx.pid;


events {
    worker_connections  1024;
}


http {
    include       mime.types;
    default_type  application/octet-stream;

    log_format  main  '$remote_addr - $remote_user [$time_local] "$request" '
                      '$status $body_bytes_sent "$http_referer" '
                      '"$http_user_agent" "$http_x_forwarded_for"';

    access_log  logs/access.log  main;

    sendfile        on;
    #tcp_nopush     on;

    #keepalive_timeout  0;
    keepalive_timeout  65;

    #gzip  on;

    server {
        listen       80;
        server_name  git.yangxu.com;

        #charset koi8-r;

        #access_log  logs/host.access.log  main;

        location / {
            root   /usr/local/data/git-repository;
            #index  index.html index.htm;
        }

        #error_page  404              /404.html;

        # redirect server error pages to the static page /50x.html
        #
        error_page   500 502 503 504  /50x.html;
        location = /50x.html {
            root   html;
        }

        # proxy the PHP scripts to Apache listening on 127.0.0.1:80
        #
        #location ~ \.php$ {
        #    proxy_pass   http://127.0.0.1;
        #}

        # pass the PHP scripts to FastCGI server listening on 127.0.0.1:9000
        #
        #location ~ \.php$ {
        #    root           html;
        #    fastcgi_pass   127.0.0.1:9000;
        #    fastcgi_index  index.php;
        #    fastcgi_param  SCRIPT_FILENAME  /scripts$fastcgi_script_name;
        #    include        fastcgi_params;
        #}

        # deny access to .htaccess files, if Apache's document root
        # concurs with nginx's one
        #
        #location ~ /\.ht {
        #    deny  all;
        #}
    }


    # another virtual host using mix of IP-, name-, and port-based configuration
    #
    #server {
    #    listen       8000;
    #    listen       somename:8080;
    #    server_name  somename  alias  another.alias;

    #    location / {
    #        root   html;
    #        index  index.html index.htm;
    #    }
    #}


    # HTTPS server
    #
    #server {
    #    listen       443 ssl;
    #    server_name  localhost;

    #    ssl_certificate      cert.pem;
    #    ssl_certificate_key  cert.key;

    #    ssl_session_cache    shared:SSL:1m;
    #    ssl_session_timeout  5m;

    #    ssl_ciphers  HIGH:!aNULL:!MD5;
    #    ssl_prefer_server_ciphers  on;

    #    location / {
    #        root   html;
    #        index  index.html index.htm;
    #    }
    #}

}
#测试配置文件是否有语法错误
./nginx -t
#Nginx在启动状态下
./nginx -s reload
#Nginx未启动状态下
./nginx
Windows 客户端
配置 hosts
192.168.25.159 git.yangxu.com
克隆项目
git clone http://git.yangxu.com/yangxu.git

CentOS 7 服务端
cd /usr/local/nginx/logs/
tail -f access.log
通过下面的日志信息可以知道,使用 git 从远程仓库获取项目时首先访问的是 /yangxu.git/info/refs。
192.168.25.141 - - [24/Aug/2020:17:39:49 +0800] "GET /yangxu.git/info/refs?service=git-upload-pack HTTP/1.1" 200 59 "-" "git/2.26.2.windows.1" "-"
192.168.25.141 - - [24/Aug/2020:17:39:49 +0800] "GET /yangxu.git/HEAD HTTP/1.1" 200 23 "-" "git/2.26.2.windows.1" "-"
192.168.25.141 - - [24/Aug/2020:17:39:49 +0800] "GET /yangxu.git/objects/c3/1ebb3d8fe253dc4236aec7b077bb27571306dc HTTP/1.1" 200 165 "-" "git/2.26.2.windows.1" "-"
192.168.25.141 - - [24/Aug/2020:17:39:49 +0800] "GET /yangxu.git/objects/bb/86ac104bb7447687b1fb5bb39fac39fe57befe HTTP/1.1" 200 54 "-" "git/2.26.2.windows.1" "-"
192.168.25.141 - - [24/Aug/2020:17:39:49 +0800] "GET /yangxu.git/objects/96/d9d2f539e7b7c1865cb02bcb9bc6f075707e9d HTTP/1.1" 200 26 "-" "git/2.26.2.windows.1" "-"
cd /usr/local/data/git-repository/yangxu.git/info
cat refs
refs 文件中记录的是 coomit ID。
c31ebb3d8fe253dc4236aec7b077bb27571306dc refs/heads/master
cd /usr/local/data/git-repository/yangxu.git
cat HEAD
HEAD 文件中记录的是当前的分支。
ref: refs/heads/master
Windows 客户端
切换到使用 SSH 协议连接的终端。
echo 'change' >> README.MD
git add -A; git commit -m '第二次提交,修改了README.MD';
git push
切换到使用 HTTP 协议连接的终端。
git pull
Git 协议
Git 协议是包含在 Git 里的一个特殊的守护进程;它监听在一个特定的端口(9418),类似于 SSH 服务,但是访问无需任何授权。
优点:目前,Git 协议是 Git 使用的网络传输协议里最快的。 如果你的项目有很大的访问量,或者你的项目很庞大并且不需要为写进行用户授权,架设 Git 守护进程来提供服务是不错的选择。 它使用与 SSH 相同的数据传输机制,但是省去了加密和授权的开销。
缺点:Git 协议缺点是缺乏授权机制。 而且 9418 是一个非标准端口,一般防火墙不会开放。
实例
配置及使用
CentOS 7 服务端
cd /usr/local/data/git-repository/yangxu.git/
# 创建一个空文件,表示开放该项目
touch git-daemon-export-ok
# 启动守护进程
#第一个/usr/local/data/git-repository/是项目路径
#第二个/usr/local/data/git-repository/是项目前缀
$nohub git daemon --reuseaddr --base-path=/usr/local/data/git-repository/ /usr/local/data/git-repository/ &
# 查看进程是否启动成功
ps -ef| grep git
Windows 客户端
#本地克隆远程项目
git clone git://192.168.25.159:9418/yangxu.git