02.Maven学习笔记–Maven核心配置
项目依懒
项目依赖是指 Maven 通过依赖传播、依赖优先原则、可选依赖、排除依赖、依赖范围等特性来管理项目 ClassPath。
依赖传播特性
我们的项目通常需要依赖第三方组件,而第三方组件又会依赖其它组件,遇到这种情况 Maven 会将依赖网络中的所有节点都会加入 ClassPath 当中,这就是 Maven 的依赖传播特性。
举例演示 Spring MVC 的依赖网络。
<!-- 添加spring web mvc演示 -->
<dependency>
  <groupId>org.springframework</groupId>
  <artifactId>spring-webmvc</artifactId>
  <version>4.0.4.RELEASE</version>
</dependency>
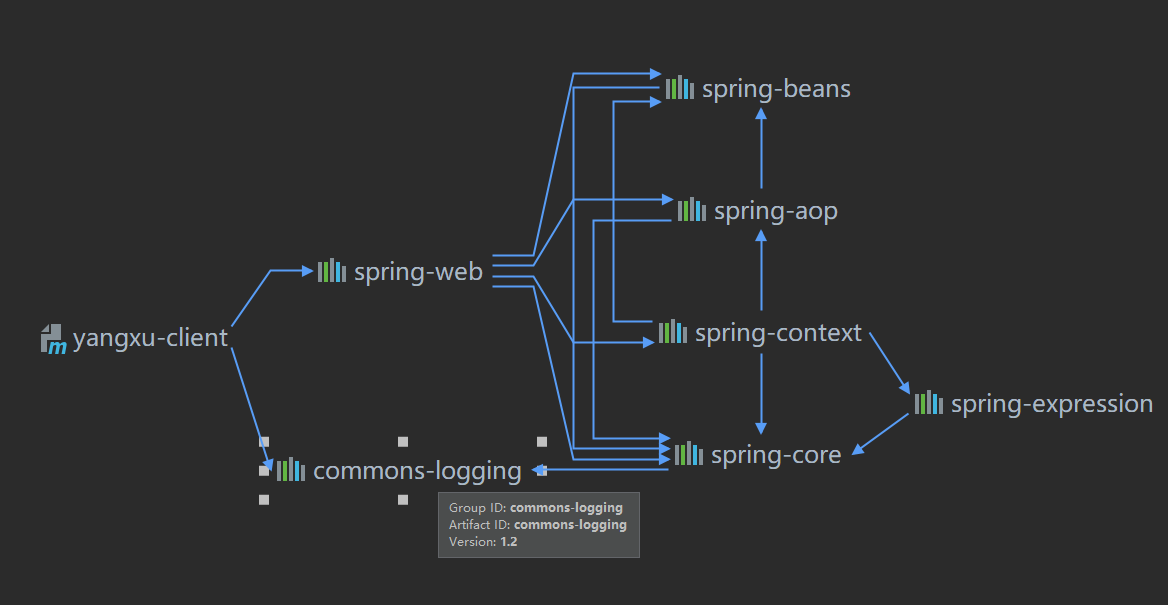
查看依赖关系:
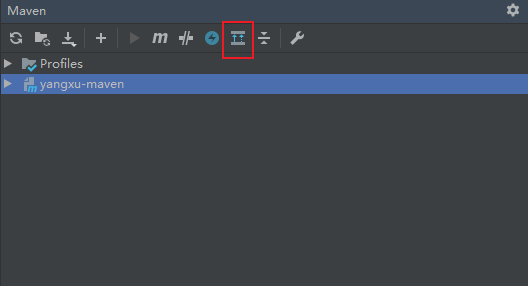
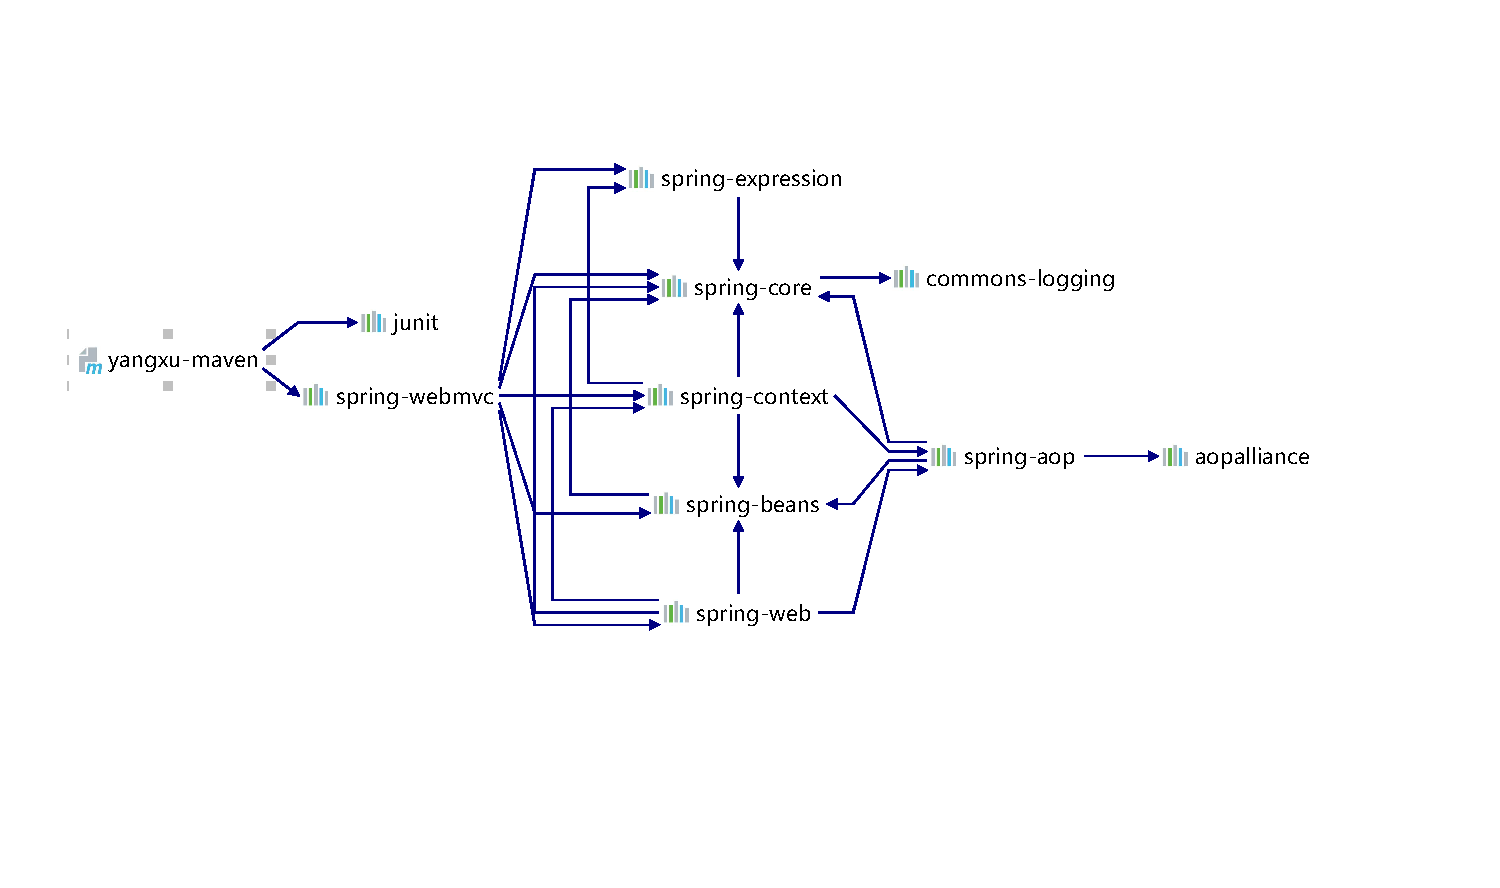
项目直接依赖了 spring-webmvc 是直接依赖,而对 commons-logging 的依赖是通过 webmvc 传递的,所以是间接依赖。
依赖优先原则
基于依赖传播特性,导致整个依赖网络会很复杂,难免会出现相同组件不同版本的情况。Maven 此时会基于依赖优先原则选择其中一个版本。
- 第一原则:最短路径优先
- 第二原则:相同路径下配置在前的优先
最短路径优先原则
spring-webmvc 依赖的 commons-logging 版本为 1.1.3,直接添加一个版本不同于 1.1.3 的 commons-logging。
<!-- 直接添加commons-logging -->
<dependency>
    <groupId>commons-logging</groupId>
    <artifactId>commons-logging</artifactId>
    <version>1.2</version>
</dependency>
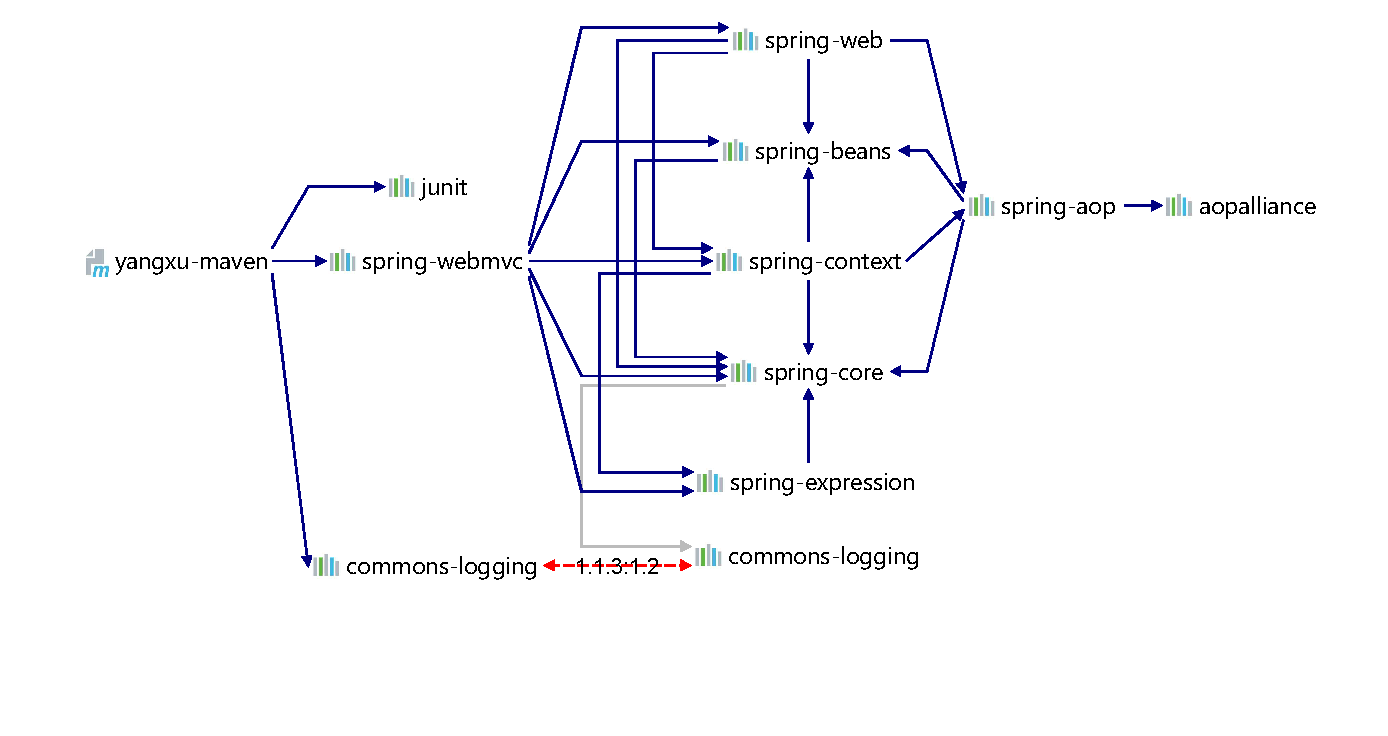
上述例子中 commons-logging 通过 spring-webmvc 依赖了 1.1.3,而项目中直接依赖了 1.2,基于最短路径原则,项目最终引入的是 1.2 版本。
yangxu-maven–>spring-webmvc–>spring-core–>commons-logging
yangxu-maven–>commons-logging(路径最短)
相同路径下配置在前的优先原则
步骤
- 添加一个 Module: yangxu-server
- 添加一个 Module: yangxu-client
- yangxu-client 依赖 commons-logging: 1.2
- yangxu-client 依赖 spring-web: 4.3.8.RELEASE
- yangxu-server 依赖 yangxu-client
- yangxu-server 依赖 spring-webmvc: 4.0.4.RELEASE
yangxu-client 的 pom 文件:
<?xml version="1.0" encoding="UTF-8"?>
<project xmlns="http://maven.apache.org/POM/4.0.0"
         xmlns:xsi="http://www.w3.org/2001/XMLSchema-instance"
         xsi:schemaLocation="http://maven.apache.org/POM/4.0.0 http://maven.apache.org/xsd/maven-4.0.0.xsd">

    <modelVersion>4.0.0</modelVersion>

    <groupId>demo.yangxu</groupId>
    <artifactId>yangxu-client</artifactId>
    <version>1.0-SNAPSHOT</version>

    <dependencies>
        <dependency>
            <groupId>commons-logging</groupId>
            <artifactId>commons-logging</artifactId>
            <version>1.1.1</version>
        </dependency>

        <dependency>
            <groupId>commons-logging</groupId>
            <artifactId>commons-logging</artifactId>
            <version>1.2</version>
        </dependency>

        <dependency>
            <groupId>org.springframework</groupId>
            <artifactId>spring-web</artifactId>
            <version>4.3.8.RELEASE</version>
        </dependency>
    </dependencies>

</project>
yangxu-server 的 pom 文件:
<?xml version="1.0" encoding="UTF-8"?>
<project xmlns="http://maven.apache.org/POM/4.0.0"
         xmlns:xsi="http://www.w3.org/2001/XMLSchema-instance"
         xsi:schemaLocation="http://maven.apache.org/POM/4.0.0 http://maven.apache.org/xsd/maven-4.0.0.xsd">
    <modelVersion>4.0.0</modelVersion>

    <groupId>demo.yangxu</groupId>
    <artifactId>yangxu-server</artifactId>
    <version>1.0-SNAPSHOT</version>

    <dependencies>
        <dependency>
            <groupId>demo.yangxu</groupId>
            <artifactId>yangxu-client</artifactId>
            <version>1.0-SNAPSHOT</version>
        </dependency>
        <dependency>
            <groupId>org.springframework</groupId>
            <artifactId>spring-webmvc</artifactId>
            <version>4.0.4.RELEASE</version>
        </dependency>
    </dependencies>


</project>
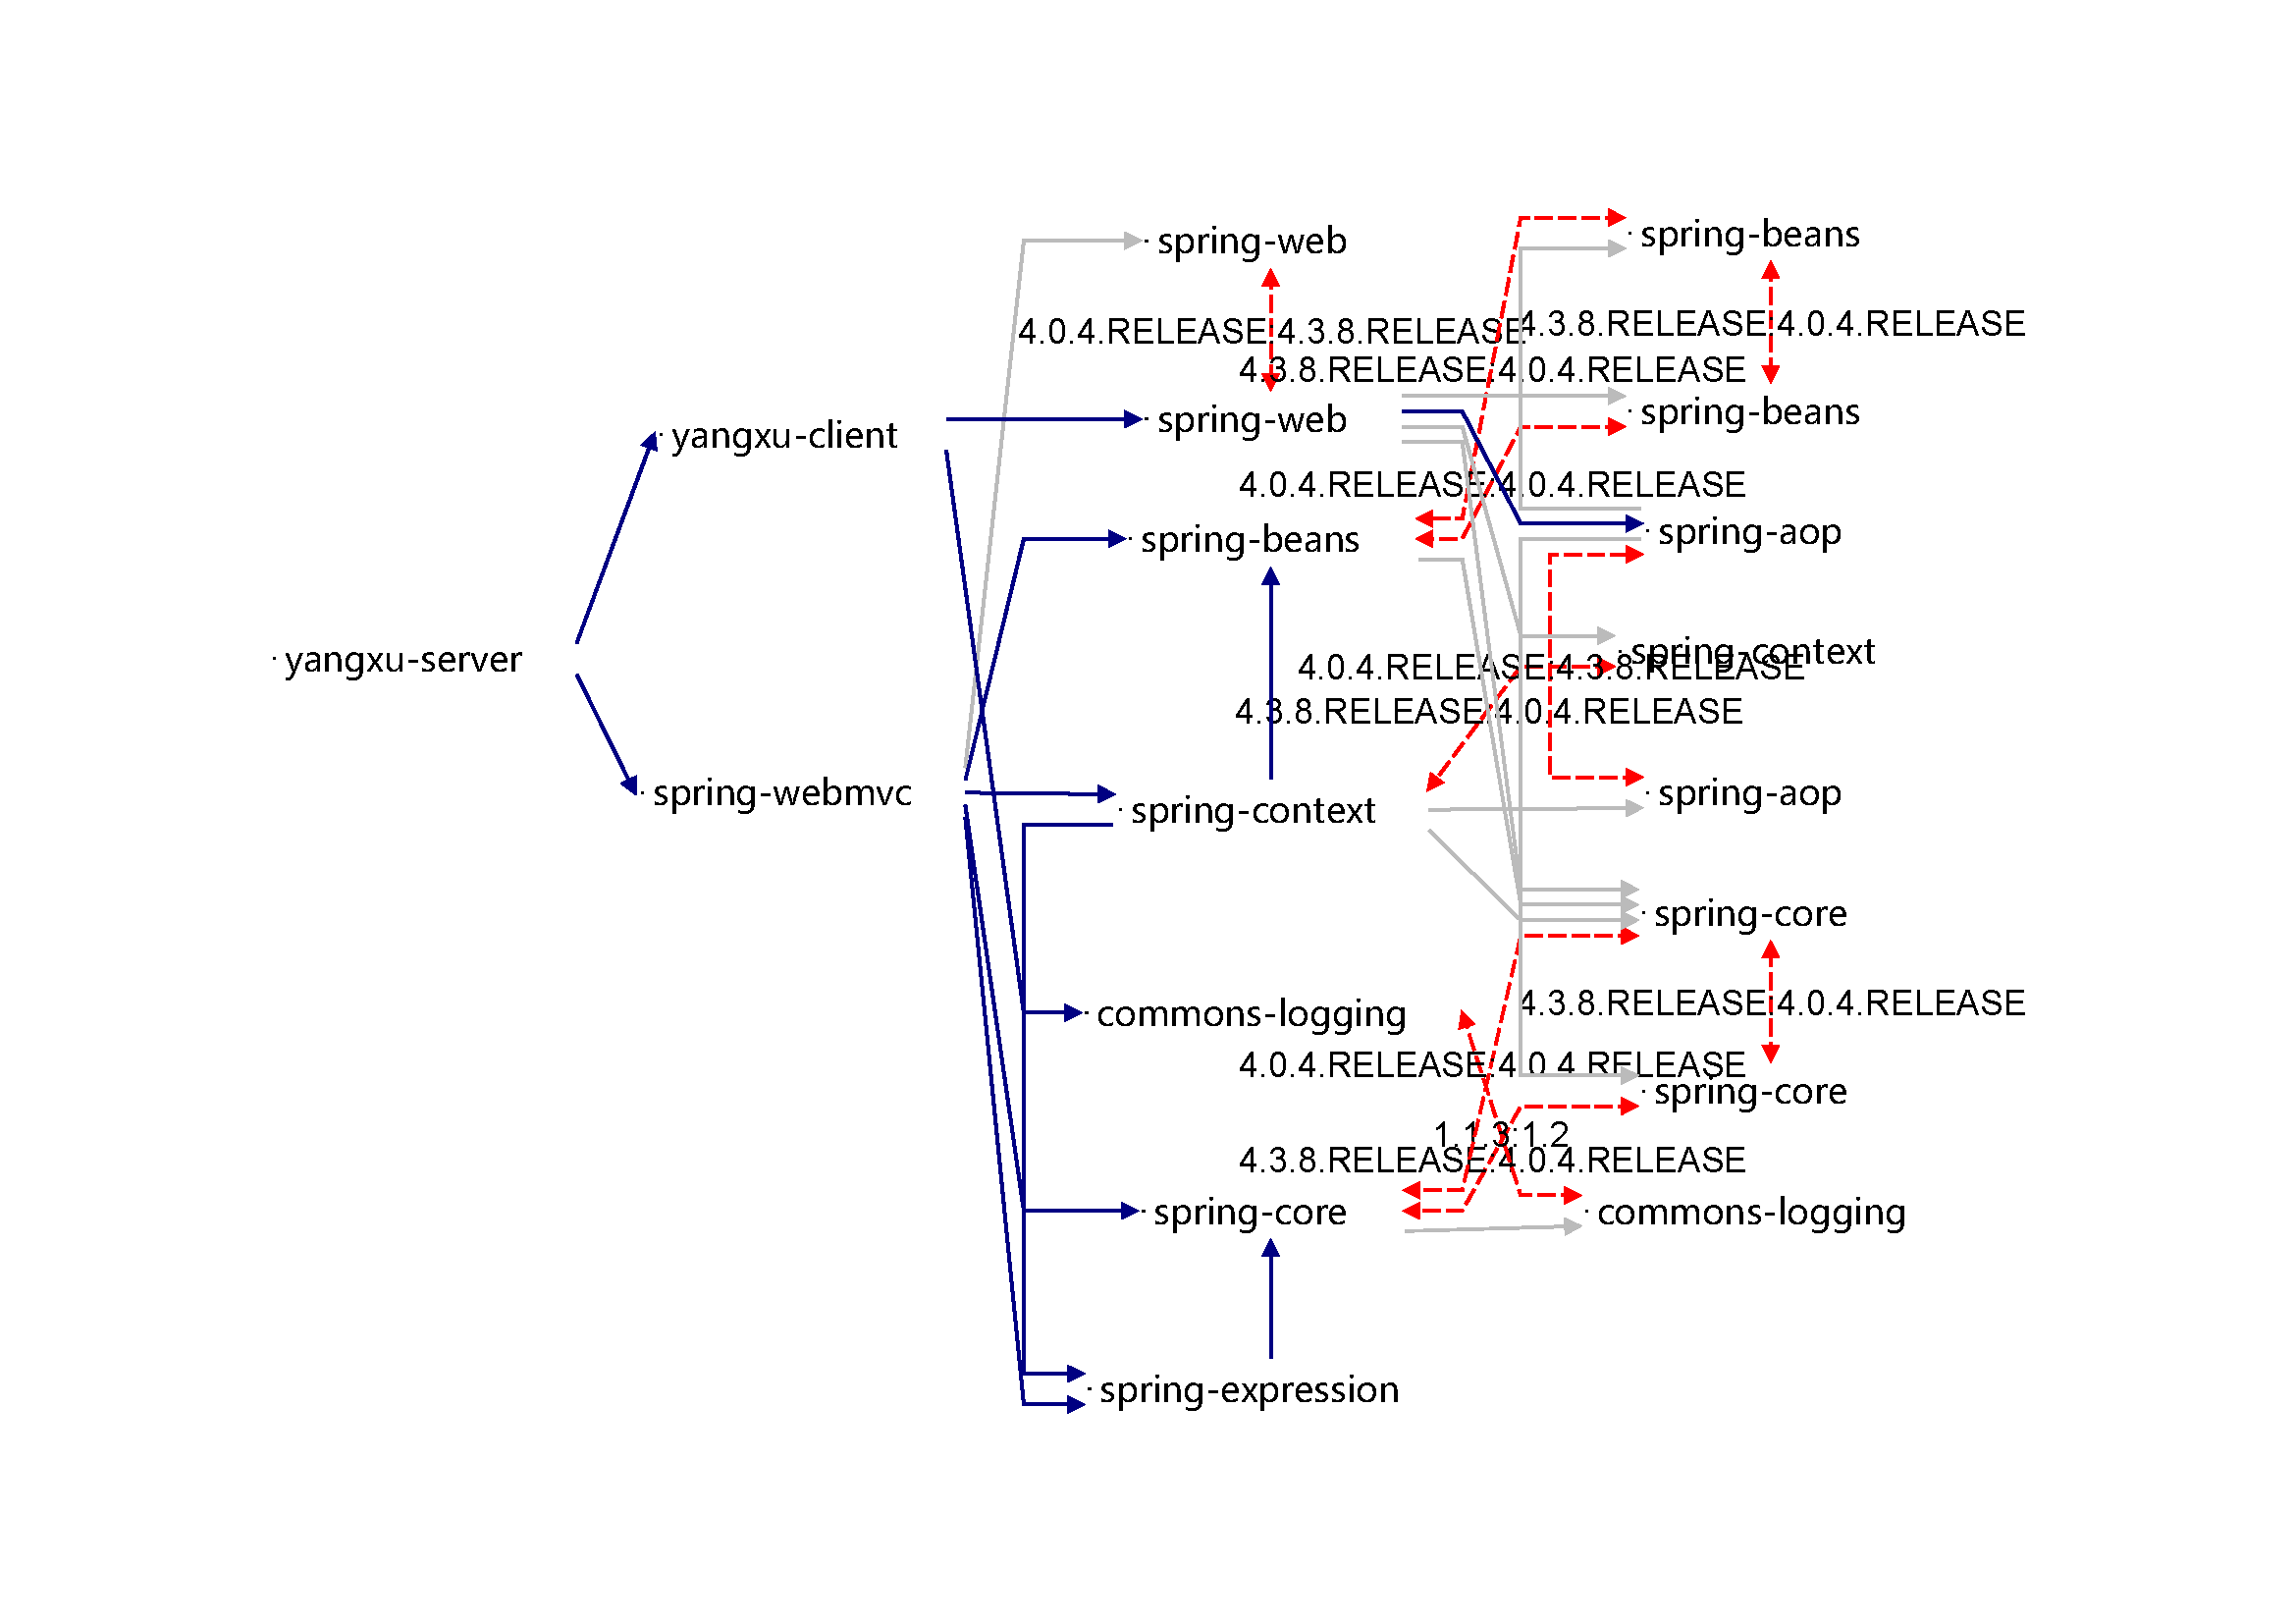
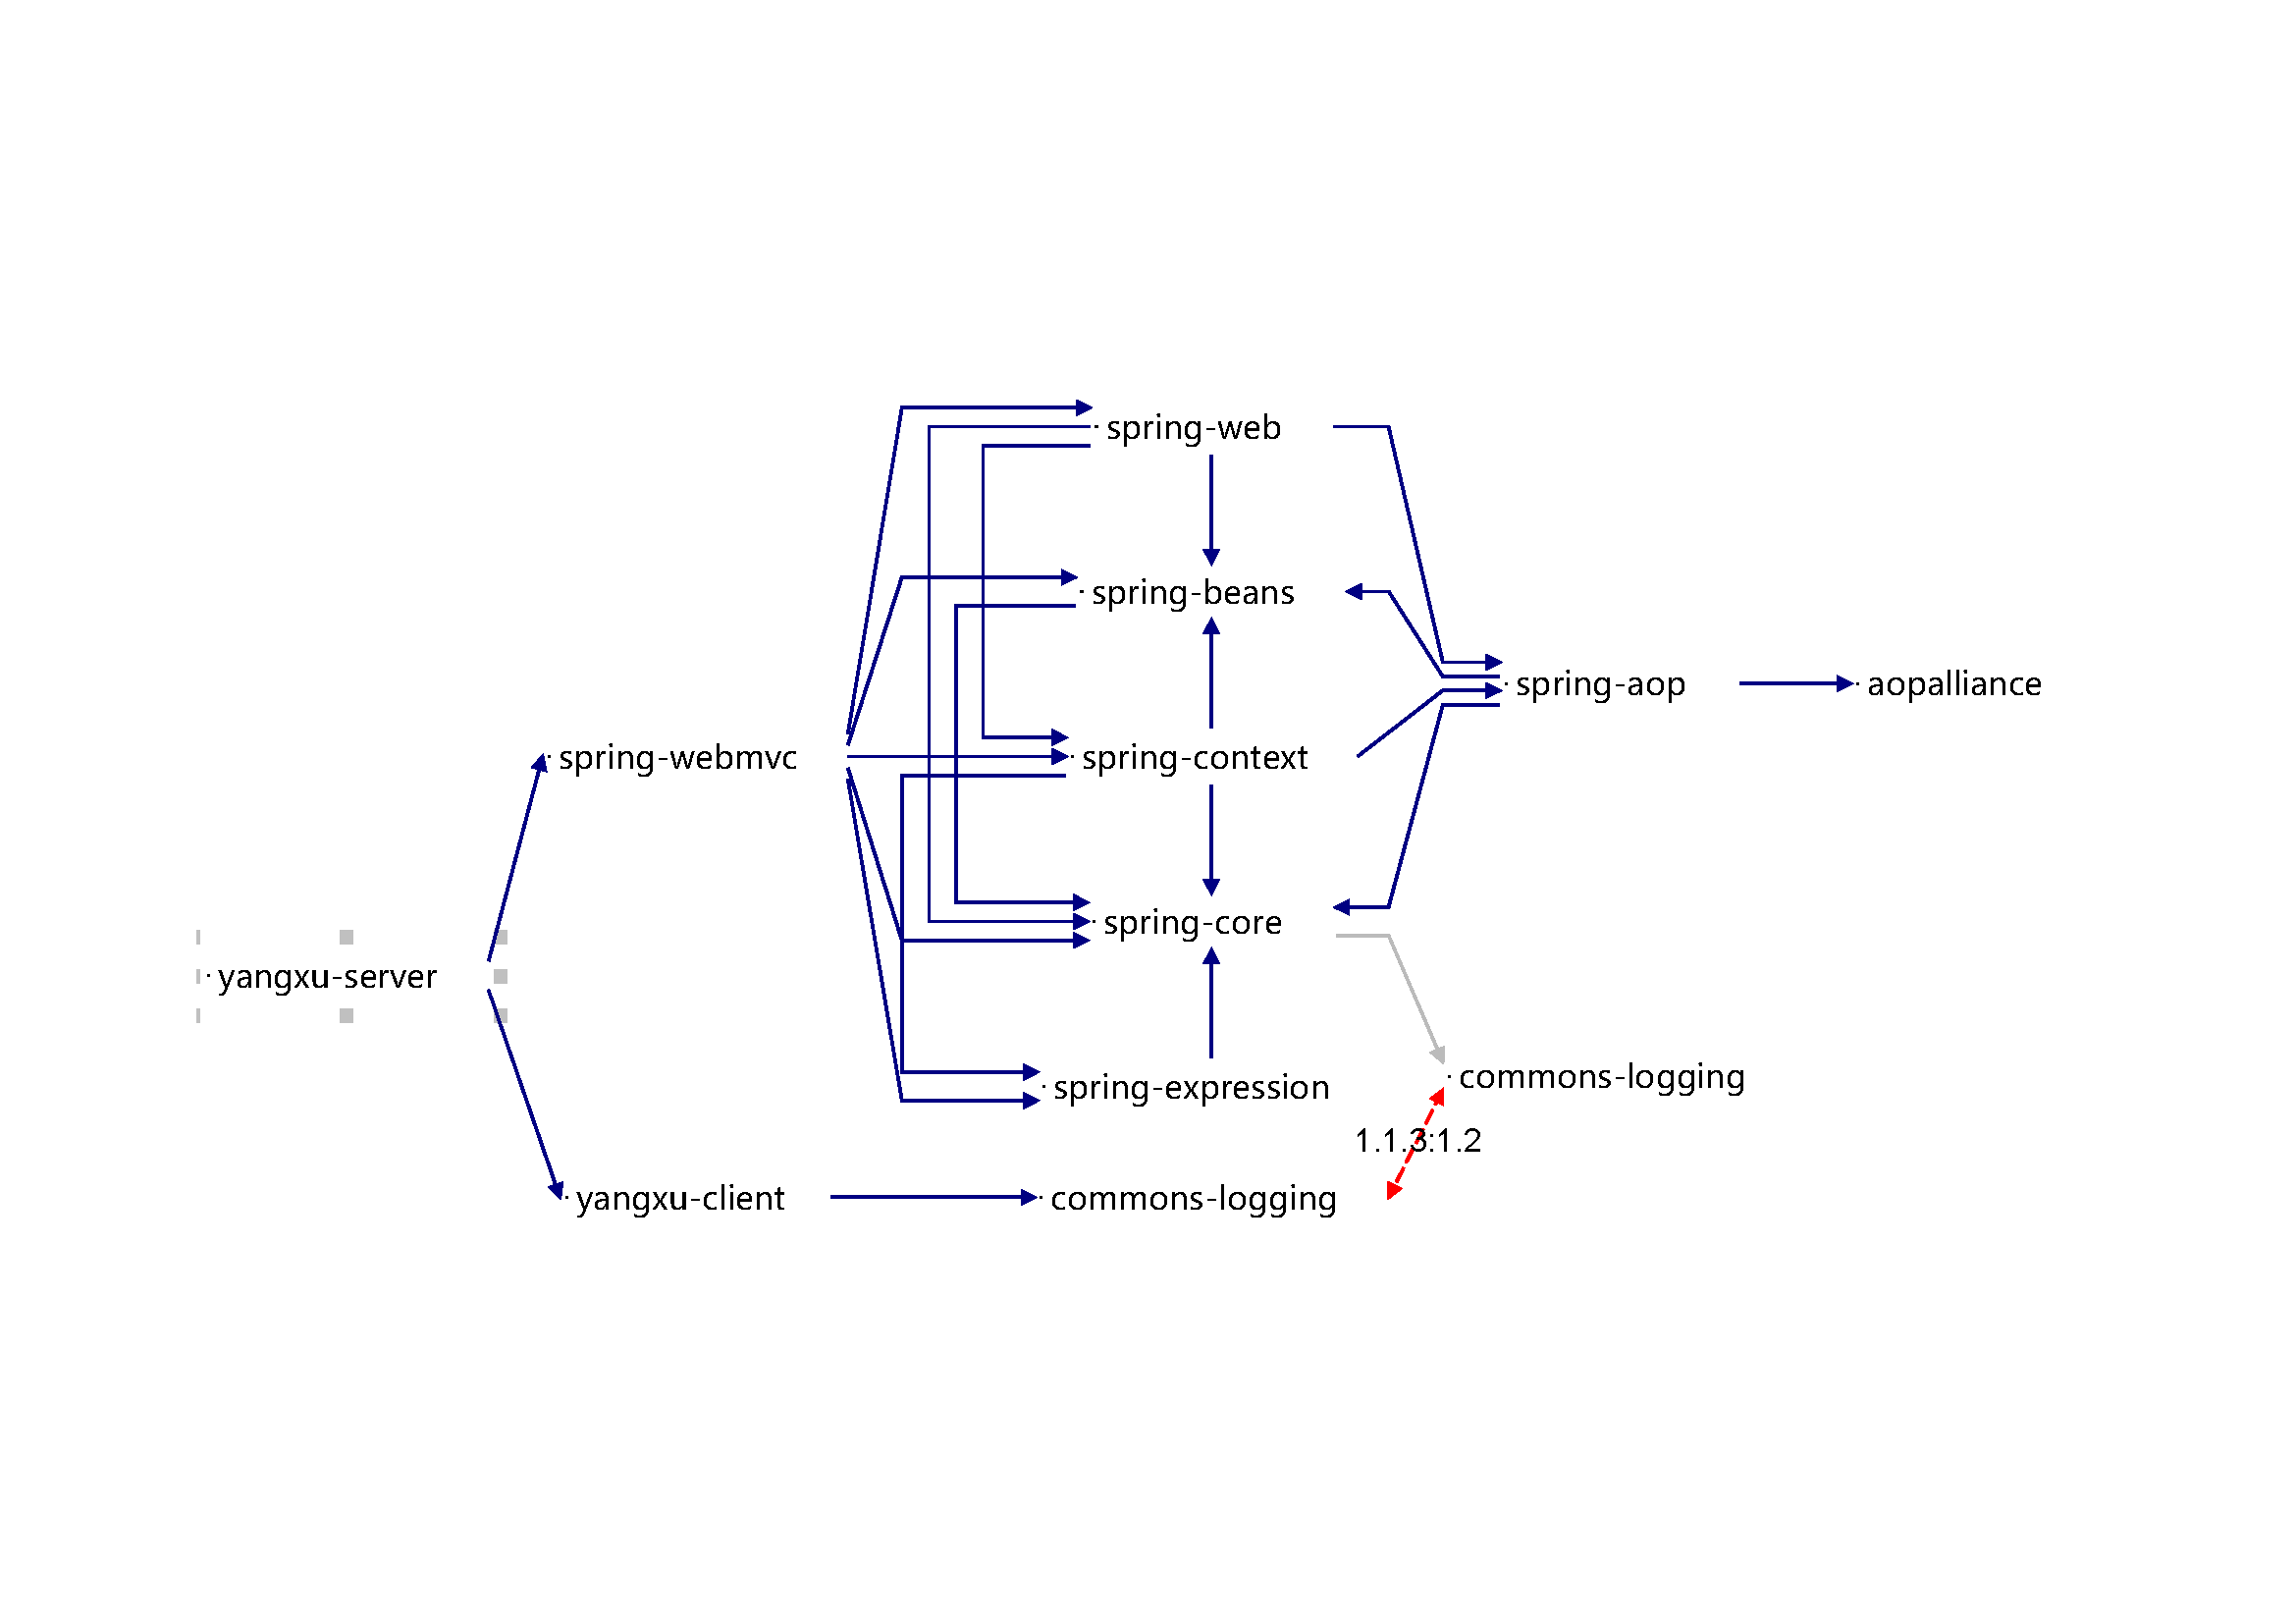
yangxu-server–>yangxu-client–>spring-web: 4.3.8.RELEASE
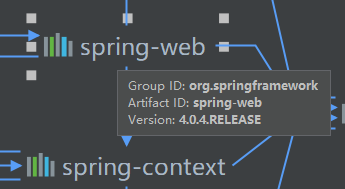
yangxu-server–>spring-webmvc–>spring-web: 4.0.4.RELEASE
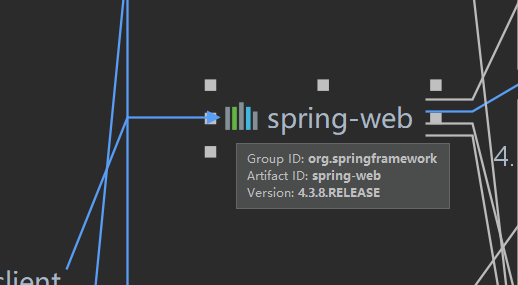
最终 yangxu-server 依赖的是 spring-web: 4.3.8.RELEASE。
注意:在同一 pom 文件,第二原则不再适应。
如下,在 yangxu-client 中配置两个版本的 commons-logging,最终引用的是 1.2 版本,而不是配置在前面的 1.1.1版本.
<dependency>
    <groupId>commons-logging</groupId>
    <artifactId>commons-logging</artifactId>
    <version>1.1.1</version>
</dependency>

<dependency>
    <groupId>commons-logging</groupId>
    <artifactId>commons-logging</artifactId>
    <version>1.2</version>
</dependency>
可选依赖
可选依赖表示这个依赖不是必须的。通过在 <dependency> 中添加 <optional>true</optional> 设置。默认是非可选的。可选依赖不会被传递。
在 yangxu-client 中将 spring-web: 4.3.8.RELEASE 设置为可选依赖:
<dependency>
    <groupId>org.springframework</groupId>
    <artifactId>spring-web</artifactId>
    <version>4.3.8.RELEASE</version>
    <optional>true</optional>
</dependency>
排除依赖
即排除指定的间接依赖。通过配置 <exclusions> 配置排除指定组件。
yangxu-client 的 pom 文件:
<?xml version="1.0" encoding="UTF-8"?>
<project xmlns="http://maven.apache.org/POM/4.0.0"
         xmlns:xsi="http://www.w3.org/2001/XMLSchema-instance"
         xsi:schemaLocation="http://maven.apache.org/POM/4.0.0 http://maven.apache.org/xsd/maven-4.0.0.xsd">

    <modelVersion>4.0.0</modelVersion>

    <groupId>demo.yangxu</groupId>
    <artifactId>yangxu-client</artifactId>
    <version>1.0-SNAPSHOT</version>

    <dependencies>

        <dependency>
            <groupId>commons-logging</groupId>
            <artifactId>commons-logging</artifactId>
            <version>1.2</version>
        </dependency>

        <dependency>
            <groupId>org.springframework</groupId>
            <artifactId>spring-web</artifactId>
            <version>4.3.8.RELEASE</version>
        </dependency>
    </dependencies>

</project>
yangxu-server 的 pom 文件:
<?xml version="1.0" encoding="UTF-8"?>
<project xmlns="http://maven.apache.org/POM/4.0.0"
         xmlns:xsi="http://www.w3.org/2001/XMLSchema-instance"
         xsi:schemaLocation="http://maven.apache.org/POM/4.0.0 http://maven.apache.org/xsd/maven-4.0.0.xsd">
    <modelVersion>4.0.0</modelVersion>

    <groupId>demo.yangxu</groupId>
    <artifactId>yangxu-server</artifactId>
    <version>1.0-SNAPSHOT</version>

    <dependencies>
        <dependency>
            <groupId>demo.yangxu</groupId>
            <artifactId>yangxu-client</artifactId>
            <version>1.0-SNAPSHOT</version>
        </dependency>
        <dependency>
            <groupId>org.springframework</groupId>
            <artifactId>spring-webmvc</artifactId>
            <version>4.0.4.RELEASE</version>
            <!-- 排除指定项目 -->
            <exclusions>
                <exclusion>
                    <groupId>org.springframework</groupId>
                    <artifactId>spring-web</artifactId>
                </exclusion>
            </exclusions>
        </dependency>
    </dependencies>


</project>
依赖范围
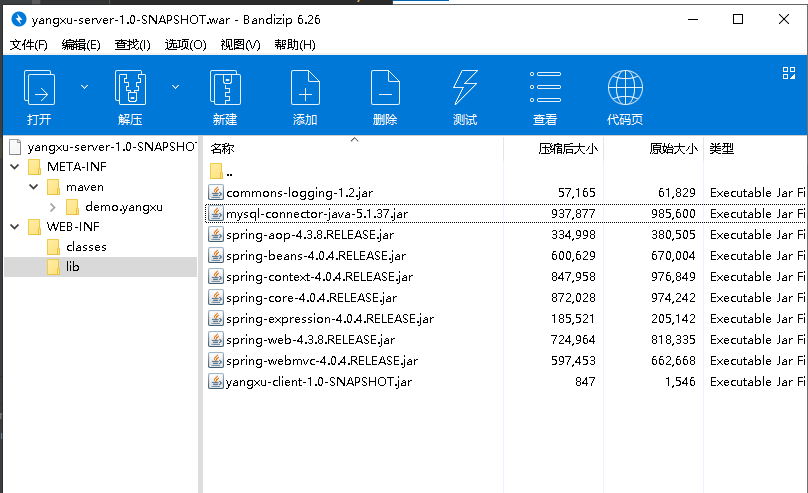
像 JUnit 这个组件,我们只有在运行测试用例的时候才要用到,这就没有必要在打包的时候把 junit.jar 包构建进去,可以通过 Maven 的依赖范围配置 <scope>来达到这种目的。
Maven 总共支持以下几种依赖范围:
- compile(默认): 编译范围,编译和打包都会依赖;
- provided:提供范围,编译时依赖,但不会打包进去。如:servlet-api.jar,Tomcat 中已经包含了此 Jar 包;
- runtime:运行时范围,打包时依赖,编译不会。如:mysql-connector-java.jar;
- test:测试范围,编译运行测试用例依赖,不会打包进去。如:junit.jar
- system:表示由系统中 CLASSPATH 指定。编译时依赖,不会打包进去。配合 <systemPath> 一起使用。示例:java.home下的 tool.jar
provided
<!-- 不会打包进去 -->
<dependency>
    <groupId>javax.servlet</groupId>
    <artifactId>servlet-api</artifactId>
    <version>2.5</version>
    <scope>provided</scope>
</dependency>
runtime
<dependency>
    <groupId>mysql</groupId>
    <artifactId>mysql-connector-java</artifactId>
    <version>5.1.37</version>
    <scope>runtime</scope>
</dependency>
test
<!-- 不会打包进去 -->
<dependency>
    <groupId>junit</groupId>
    <artifactId>junit</artifactId>
    <version>4.12</version>
    <scope>test</scope>
</dependency>
完整 pom 文件:
<?xml version="1.0" encoding="UTF-8"?>
<project xmlns="http://maven.apache.org/POM/4.0.0"
         xmlns:xsi="http://www.w3.org/2001/XMLSchema-instance"
         xsi:schemaLocation="http://maven.apache.org/POM/4.0.0 http://maven.apache.org/xsd/maven-4.0.0.xsd">
    <modelVersion>4.0.0</modelVersion>

    <groupId>demo.yangxu</groupId>
    <artifactId>yangxu-server</artifactId>
    <version>1.0-SNAPSHOT</version>
    <packaging>war</packaging>

    <dependencies>
        <dependency>
            <groupId>junit</groupId>
            <artifactId>junit</artifactId>
            <version>4.12</version>
            <scope>test</scope>
        </dependency>

        <dependency>
            <groupId>javax.servlet</groupId>
            <artifactId>servlet-api</artifactId>
            <version>2.5</version>
            <scope>provided</scope>
        </dependency>

        <dependency>
            <groupId>mysql</groupId>
            <artifactId>mysql-connector-java</artifactId>
            <version>5.1.37</version>
            <scope>runtime</scope>
        </dependency>

        <dependency>
            <groupId>demo.yangxu</groupId>
            <artifactId>yangxu-client</artifactId>
            <version>1.0-SNAPSHOT</version>
        </dependency>
        <dependency>
            <groupId>org.springframework</groupId>
            <artifactId>spring-webmvc</artifactId>
            <version>4.0.4.RELEASE</version>

        </dependency>
    </dependencies>


</project>
打包后的结果:
system
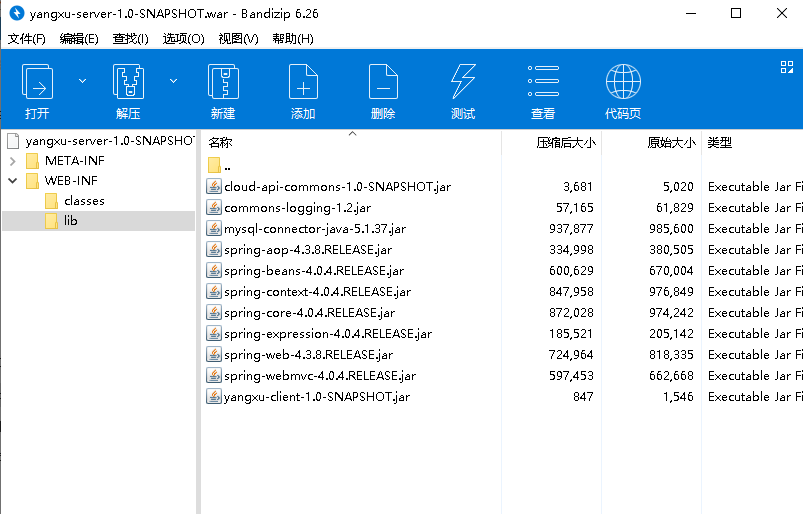
system 除了可以用于引入系统 classpath 中的包,也可以用于引入系统而非 Maven 收录的第三方 Jar 包,做法是将第三方 Jar 包放置在项目的 lib 目录下,然后配置相对路径,但因为 system 不会打包进去,所以需要配合 maven-dependency-plugin 插件配合使用。当然最好是将第三方 Jar 包手动 install 到仓库中去。
配置环境变量
变量名: CLASSPATH
变量值: .;%Java_Home%\lib;%Java_Home%\lib\tools.jar
system 的通常使用方式,引入系统 classpath 中的包:
<!-- system 的通常使用方式-->
<dependency>
    <groupId>com.sun</groupId>
    <artifactId>tools</artifactId>
    <version>${java.version}</version>
    <scope>system</scope>
    <optional>true</optional>
    <systemPath>${java.home}/../lib/tools.jar</systemPath>
</dependency>
system 另外使用方式,将工程内的 Jar 包直接引入:
<!-- system 另外使用方式 ,将工程内的jar直接引入 -->
<dependency>
    <groupId>demo.yangxu.springcloud</groupId>
    <artifactId>cloud-api-commons</artifactId>
    <version>1.0-SNAPSHOT</version>
    <scope>system</scope>
    <optional>true</optional>
    <systemPath>${basedir}/lib/cloud-api-commons-1.0-SNAPSHOT.jar</systemPath>
</dependency>
通过插件将 system 的 Jar 打包进去:
<build>
    <plugins>
        <plugin>
            <groupId>org.apache.maven.plugins</groupId>
            <artifactId>maven-dependency-plugin</artifactId>
            <version>2.10</version>
            <executions>
                <execution>
                    <id>copy-dependencies</id>
                    <phase>compile</phase>
                    <goals>
                        <goal>copy-dependencies</goal>
                    </goals>
                    <configuration>
                        <outputDirectory>${project.build.directory}/${project.build.finalName}/WEB-INF/lib</outputDirectory>
                        <includeScope>system</includeScope>
                        <!-- 排除的jar包 -->
                        <excludeGroupIds>com.sun</excludeGroupIds>
                    </configuration>
                </execution>
            </executions>
        </plugin>
    </plugins>
</build>
打包后的结果:
手动加入到本地仓库
mvn install:install-file -Dfile=D:/jar/ojdbc14.jar -DgroupId=com.oracle.jdbc -DartifactId=ojdbc14 -Dversion=10.2.0.1.0 -Dpackaging=jar
参考:
Maven丨使用IDEA将本地的ojdbc14.Jar包添加到个人仓库中
项目聚合与继承
聚合
是指将多个模块整合在一起,统一构建,避免一个一个的构建。聚合需要个父工程,然后使用 <modules> 进行配置,其中对应的是子工程的相对路径。
<modules>
    <module>yangxu-server</module>
    <module>yangxu-client</module>
</modules>
继承
继承是指子工程直接继承父工程当中的属性、依赖、插件等配置,避免重复配置.。
可继承的 pom 元素:
groupId:项目组IDversion:项目版本distributionManagement:项目的部署配置properties:自定义的Maven属性dependencies:项目的依赖配置dependencyManagement:项目的依赖管理配置build:包括项目的源码目录配置、输出目录配置、插件配置、插件管理配置等
上面的 pom 元素子工程都可以进行重写,重写之后以子工程的为准。
依赖管理
通过继承的特性,子工程是可以间接依赖父工程的依赖,但多个子工程依赖有时并不一至,这时就可以在父工程中加入 <dependencyManagement> 声明该功程需要的 Jar 包,然后在子工程中引入。
父工程中声明:
<!-- 子模块继承之后,提供作用:锁定版本+子modlue不用写groupId和version  -->
<dependencyManagement>
    <dependencies>
      <dependency>
        <groupId>org.projectlombok</groupId>
        <artifactId>lombok</artifactId>
        <version>${lombok.version}</version>
        <optional>true</optional>
      </dependency>
    </dependencies>
</dependencyManagement>
子工程中引入:
<!-- 子工程中引入 -->
<dependencies>
    <dependency>
        <groupId>org.projectlombok</groupId>
        <artifactId>lombok</artifactId>
        <optional>true</optional>
    </dependency>
</dependencies>
项目属性
通过 <properties> 配置属性参数,可以简化配置。
<!-- 统一管理jar包版本 -->
<properties>
    <project.build.sourceEncoding>UTF-8</project.build.sourceEncoding>
    <maven.compiler.source>1.8</maven.compiler.source>
    <maven.compiler.target>1.8</maven.compiler.target>
    <junit.version>4.12</junit.version>
    <log4j.version>1.2.17</log4j.version>
    <lombok.version>1.16.18</lombok.version>
    <mysql.version>5.1.47</mysql.version>
    <druid.version>1.1.16</druid.version>
    <mybatis.spring.boot.version>1.3.0</mybatis.spring.boot.version>
</properties>

<!--引用方式-->
<dependencyManagement>
    <dependencies>
      <dependency>
        <groupId>mysql</groupId>
        <artifactId>mysql-connector-java</artifactId>
        <version>${mysql.version}</version>
      </dependency>
      <dependency>
        <groupId>com.alibaba</groupId>
        <artifactId>druid</artifactId>
        <version>${druid.version}</version>
      </dependency>
      <dependency>
        <groupId>org.mybatis.spring.boot</groupId>
        <artifactId>mybatis-spring-boot-starter</artifactId>
        <version>${mybatis.spring.boot.version}</version>
      </dependency>
      <dependency>
        <groupId>junit</groupId>
        <artifactId>junit</artifactId>
        <version>${junit.version}</version>
      </dependency>
      <dependency>
        <groupId>log4j</groupId>
        <artifactId>log4j</artifactId>
        <version>${log4j.version}</version>
      </dependency>
      <dependency>
        <groupId>org.projectlombok</groupId>
        <artifactId>lombok</artifactId>
        <version>${lombok.version}</version>
        <optional>true</optional>
      </dependency>
    </dependencies>
</dependencyManagement>
Maven 默认的属性:
- ${basedir} —— 项目根目录
- ${version} —— 表示项目版本
- ${project.basedir} —— 同 ${basedir}
- ${project.version} —— 表示项目版本,与 ${version} 相同
- ${project.build.directory} —— 构建目录,缺省为 target
- ${project.build.sourceEncoding} —— 表示主源码的编码格式
- ${project.build.sourceDirectory} —— 表示主源码路径
- ${project.build.finalName} —— 表示输出文件名称
- ${project.build.outputDirectory} —— 构建过程输出目录,缺省为 target/classes
项目构建配置
构建资源配置
基本配置示例:
<defaultGoal>package</defaultGoal>
<directory>${basedir}/target2</directory>
<finalName>${artifactId}-${version}</finalName>
说明:
- defaultGoal —— 执行构建时默认的 goal 或 phase,如 jar:jar 或者 package 等
- directory —— 构建的结果所在的路径,默认为 ${basedir}/target 目录
- finalName —— 构建的最终结果的名字,该名字可能在其他 plugin 中被改变
<resources> 配置示例:
<build>
    <resources>
        <resource>
            <directory>src/main/java</directory>
            <!--默认只打包.java文件-->
            <!--配置后可以打包除了.java文件以外的文件类型-->
            <includes>
                <include>**/*.MF</include>
                <include>**/*.XML</include>
            </includes>
            <filtering>true</filtering>
        </resource>

        <resource>
            <directory>src/main/resources</directory>
            <includes>
                <include>**/*</include>
                <include>*</include>
            </includes>
            <filtering>true</filtering>
        </resource>
    </resources>
</build>
说明:
-
resources —— build 过程中涉及的资源文件
-
targetPath —— 资源文件的目标路径
-
directory —— 资源文件的路径,默认位于 ${basedir}/src/main/resources/ 目录下
-
includes —— 一组文件名的匹配模式,被匹配的资源文件将被构建过程处理
-
excludes —— 一组文件名的匹配模式,被匹配的资源文件将被构建过程忽略。同时被 includes 和 excludes 匹配的资源文件,将被忽略
-
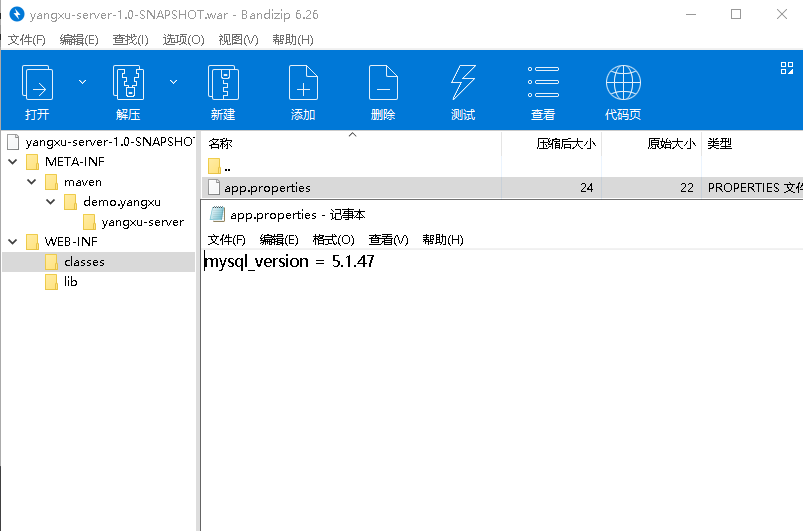
filtering —— 默认 false,true 表示通过参数对资源文件中的 ${key} 在编译时进行动态变更。替换源可为 -Dkey 或 pom 中的 <properties> 值或 <filters> 中指定的 properties 文件
filtering 示例
src\main\resources\app.properties
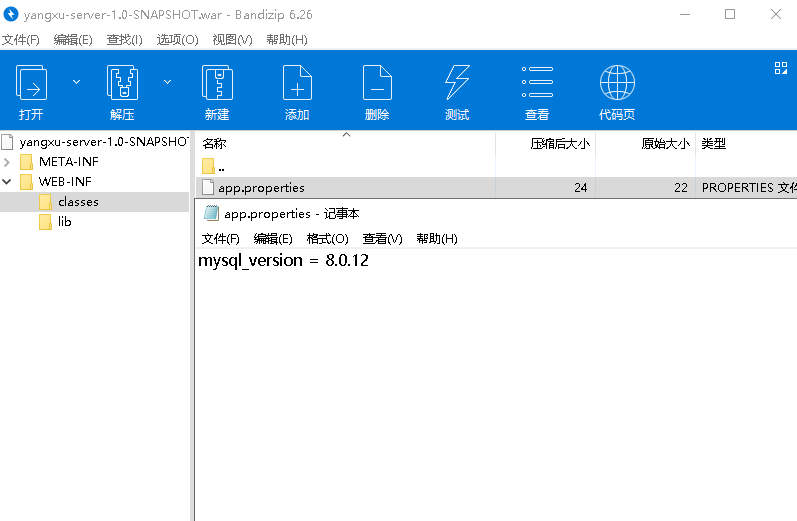
mysql_version = ${mysql.version}
使用 pom 中的 <properties> 值
pom.xml
<properties>
    <mysql.version>5.1.47</mysql.version>
</properties>
打包后的结果:
使用 -Dkey
步骤 1:
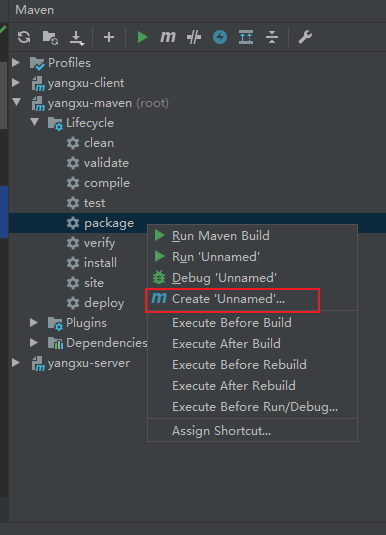
步骤 2:
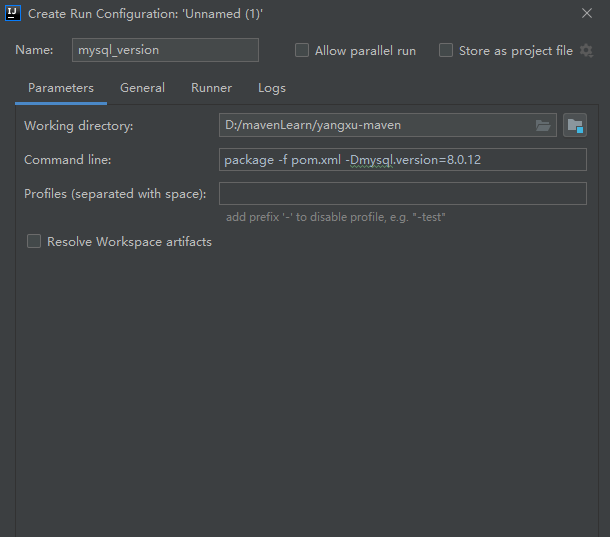
步骤 3:
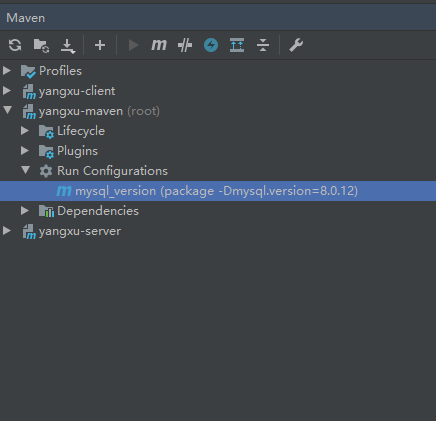
打包后的结果:
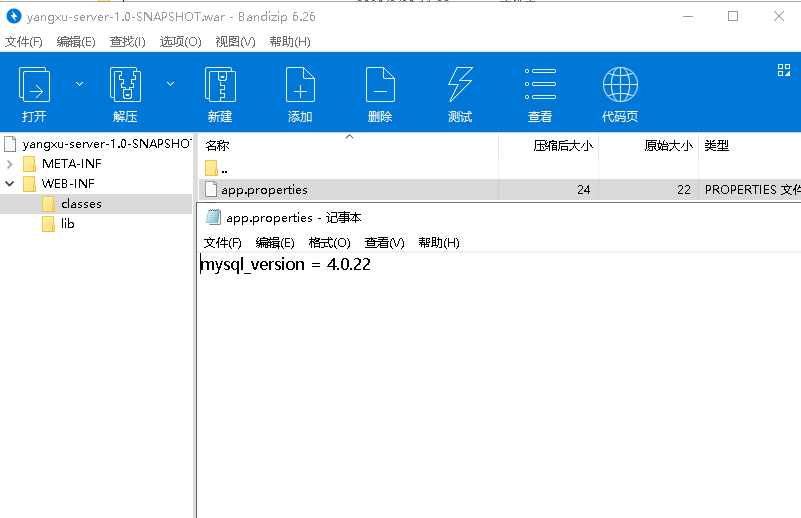
使用 <filters> 中指定的 properties 文件
filters\mysql_version.properties
mysql.version = 4.0.22
src\main\resources\app.properties
mysql_version = ${mysql.version}
pom.xml
<build>
        <filters>
            <filter>filters/mysql_version.properties</filter>
        </filters>
</build>
打包后的结果:
优先级:
-Dkey >
pom 中的 <properties> 值 >
<filters> 中指定的 properties 文件