11.Spring Cloud Alibaba学习笔记–Seata简介及安装方法
分布式事务问题由来
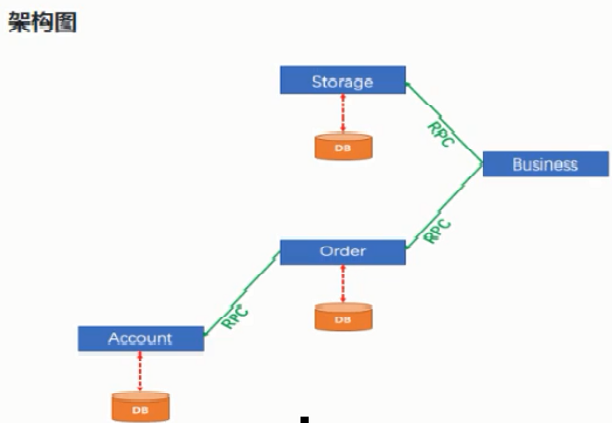
单体应用被拆分成微服务应用,原来单体应用的三个模块被拆分成三个独立的应用,分别使用三个独立的数据源,业务操作需要调用三个微服务来完成。此时每个服务内部的数据一致性由本地事务来保证,但是全局的数据一致性没法保证。
比如用户购买商品的业务逻辑,整个业务逻辑由 3 个微服务提供支持:
-
仓储服务:对给定的商品扣除仓储数量。
-
订单服务:根据采购需求创建订单。
-
账户服务:从用户账户中扣除余额。

一次业务操作需要垮多个数据源,或需要垮多个系统进行远程调用,就会产生分布式事务问题。
Seata介绍
概述
Seata 是一款开源的分布式事务解决方案,致力于在微服务架构下提供高性能和简单易用的分布式事务服务。
2019 年 1 月蚂蚁金服和阿里巴巴共同开源的分布式事务解决方案。
Simple Extensible Autonomous Transaction Architecture,简单可扩展自治事务框架。
在 Seata 开源之前,Seata 对应的内部版本在阿里经济体内部一直扮演着分布式一致性中间件的角色,帮助经济体平稳的度过历年的双11,对各BU业务进行了有力的支撑。经过多年沉淀与积累,商业化产品先后在阿里云、金融云进行售卖。2019.1 为了打造更加完善的技术生态和普惠技术成果,Seata 正式宣布对外开源,未来 Seata 将以社区共建的形式帮助其技术更加可靠与完备。
官网地址:
http://seata.io/zh-cn/
分布式事务处理过程模型
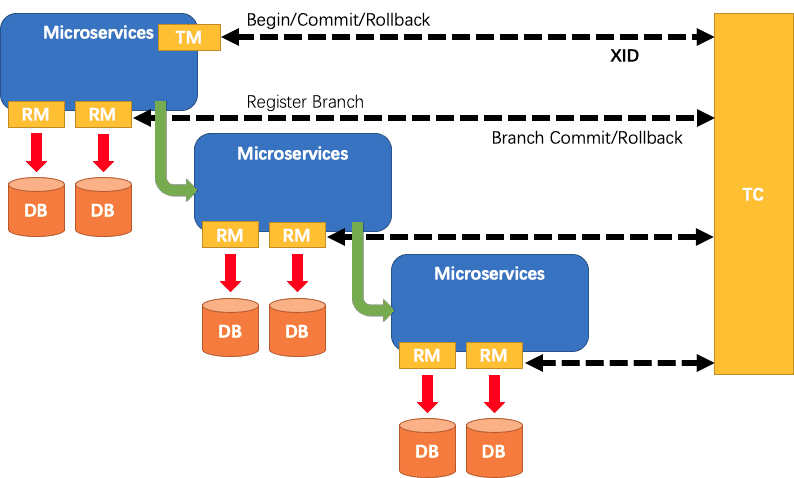
一个 ID + 三个组件模型。
一个 ID
Transaction ID (XID) —— 全局唯一的事务 ID
三个组件
- Transaction Coordinator (TC) —— 事务协调器,维护全局事务的运行状态,负责协调并驱动全局事务的提交或回滚
- Transaction Manager (TM) —— 事务管理器,控制全局事务的边界,负责开启一个全局事务,并最终发起全局提交或全局回滚的决议
- Resource Manager (RM) —— 资源管理器,控制分支事务,负责分支注册、状态汇报,并接受事务协调的指令,驱动分支 (本地) 事务的提交和回滚
一个典型的分布式事务过程

- TM 向 TC 申请开启一个全局事务,全局事务创建成功并生成一个全局唯一的 XID;
- XID 在微服务调用链路的上下文中传播;
- RM 向 TC 注册分支事务,将其纳入 XID 对应全局事务的管辖;
- TM 向 TC 发起针对 XID 的全局提交或回滚决议;
- TC 调度 XID 下管辖的全部分支事务完成提交或回滚请求。
发布网址
https://github.com/seata/seata/releases
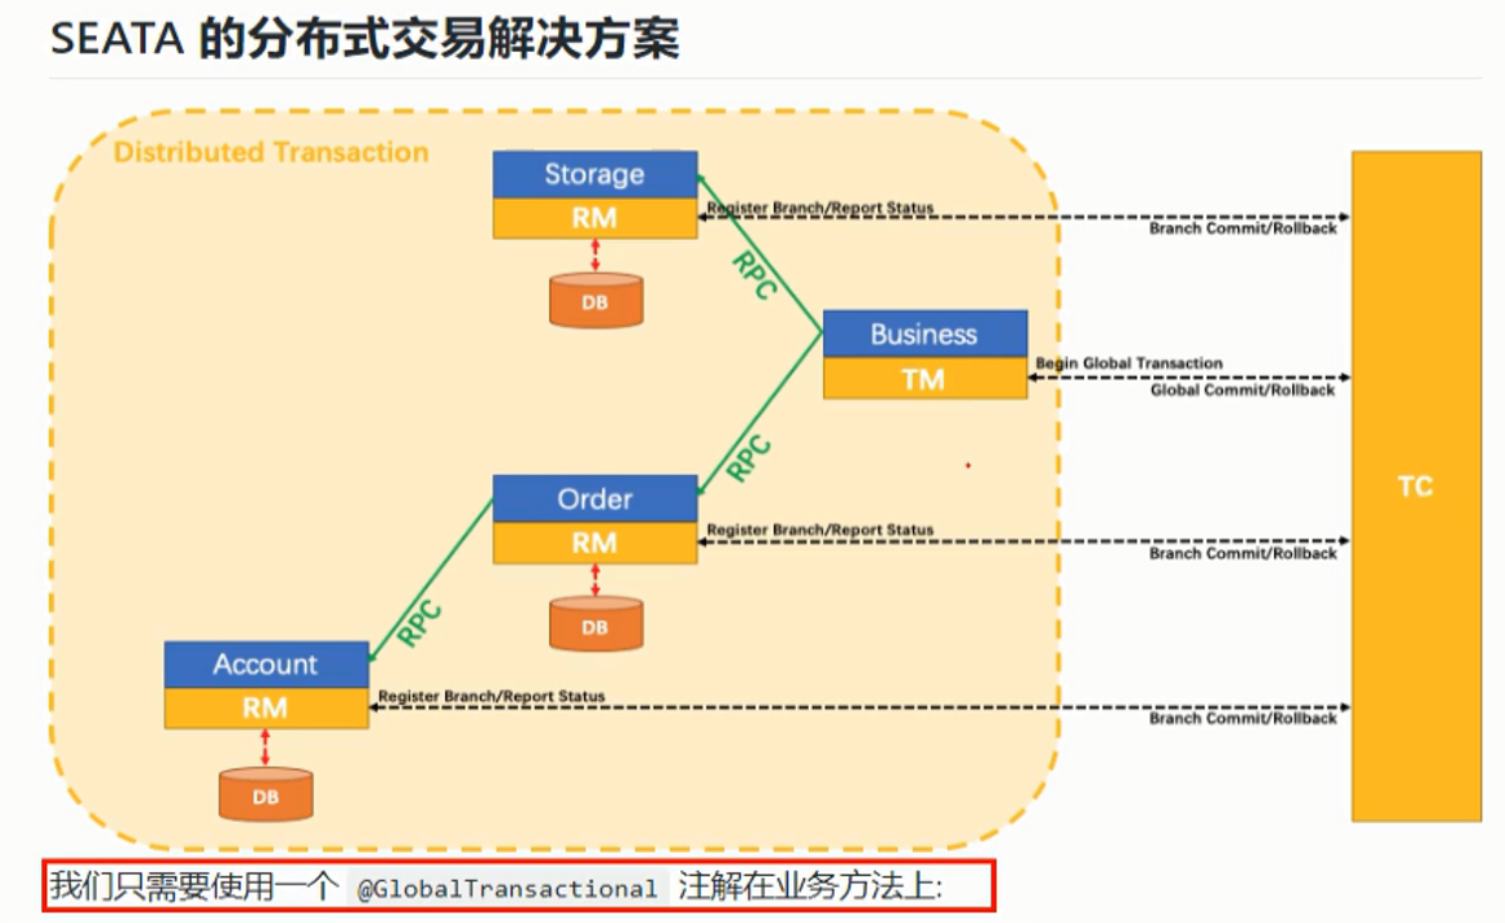
Seata 的分布式交易解决方案

Seata-Server安装
下载地址
https://github.com/seata/seata/releases/tag/v0.9.0
MySQL 5.7 数据库新建库 seata
建表 db_store.sql 在 seata-server-0.9.0\seata\conf 目录。
修改conf目录下的file.conf配置文件
主要修改:自定义事务组名称 + 事务日志存储模式为 db + 数据库连接
1、先备份原始 file.conf 文件
2、修改 service 模块
可能在第 29 行
service {
  #vgroup->rgroup
  #vgroup_mapping.my_test_tx_group = "default"
  #-----------------修改自定义事务组名称-------------
  vgroup_mapping.fsp_tx_group = "default"
  #-----------------修改自定义事务组名称-------------
  #only support single node
  default.grouplist = "127.0.0.1:8091"
  #degrade current not support
  enableDegrade = false
  #disable
  disable = false
  #unit ms,s,m,h,d represents milliseconds, seconds, minutes, hours, days, default permanent
  max.commit.retry.timeout = "-1"
  max.rollback.retry.timeout = "-1"
}
3、修改 store 模块
可能在第 55 行
## transaction log store
store {
  ## store mode: file、db
  #-----------------修改事务日志存储模式为db-------------
  mode = "db"
  #-----------------修改事务日志存储模式为db-------------

  ## file store
  file {
    dir = "sessionStore"

    # branch session size , if exceeded first try compress lockkey, still exceeded throws exceptions
    max-branch-session-size = 16384
    # globe session size , if exceeded throws exceptions
    max-global-session-size = 512
    # file buffer size , if exceeded allocate new buffer
    file-write-buffer-cache-size = 16384
    # when recover batch read size
    session.reload.read_size = 100
    # async, sync
    flush-disk-mode = async
  }

  ## database store
  db {
    ## the implement of javax.sql.DataSource, such as DruidDataSource(druid)/BasicDataSource(dbcp) etc.
    datasource = "dbcp"
    ## mysql/oracle/h2/oceanbase etc.
    db-type = "mysql"
    driver-class-name = "com.mysql.jdbc.Driver"
    #-----------------修改数据库连接-------------
    url = "jdbc:mysql://192.168.25.158:3306/seata"
    user = "root"
    password = "RzMCMsJ&*4oi09Kc"
    #-----------------修改数据库连接-------------
    min-conn = 1
    max-conn = 3
    global.table = "global_table"
    branch.table = "branch_table"
    lock-table = "lock_table"
    query-limit = 100
  }
}
解决端口被占用问题
Seata 的端口默认为 8091,若 8091 端口已被占用了,可以杀死占用端口的进程或者修改默认端口号 8091。
修改默认端口号的方法为修改 file.conf:修改 service 中的default.grouplist
service {
  #vgroup->rgroup
  vgroup_mapping.fsp_tx_group = "default"
  #only support single node
  default.grouplist = "127.0.0.1:8092"
  #degrade current not support
  enableDegrade = false
  #disable
  disable = false
  #unit ms,s,m,h,d represents milliseconds, seconds, minutes, hours, days, default permanent
  max.commit.retry.timeout = "-1"
  max.rollback.retry.timeout = "-1"
}
启动时使用命令:seata-server.bat -p 8092
修改 registry.conf 配置文件
位于 seata-server-0.9.0\seata\conf 目录下
1、先备份原始 registry.conf 文件
2、修改注册类型为 nacos
可能在第 3 行
3、修改 nacos 的连接信息
可能在第 5 行
原文件的 nacos 地址是 localhost,注意要加上端口号 8848
registry {
  # file 、nacos 、eureka、redis、zk、consul、etcd3、sofa
  #-----------------修改注册类型为 nacos-------------
  type = "nacos"
  #-----------------修改注册类型为 nacos-------------

  nacos {
    #-----------------修改 nacos 的连接信息-------------
    serverAddr = "localhost:8848"
    namespace = ""
    cluster = "default"
    #-----------------修改 nacos 的连接信息-------------
  }
  eureka {
    serviceUrl = "http://localhost:8761/eureka"
    application = "default"
    weight = "1"
  }
  redis {
    serverAddr = "localhost:6379"
    db = "0"
  }
  zk {
    cluster = "default"
    serverAddr = "127.0.0.1:2181"
    session.timeout = 6000
    connect.timeout = 2000
  }
  consul {
    cluster = "default"
    serverAddr = "127.0.0.1:8500"
  }
  etcd3 {
    cluster = "default"
    serverAddr = "http://localhost:2379"
  }
  sofa {
    serverAddr = "127.0.0.1:9603"
    application = "default"
    region = "DEFAULT_ZONE"
    datacenter = "DefaultDataCenter"
    cluster = "default"
    group = "SEATA_GROUP"
    addressWaitTime = "3000"
  }
  file {
    name = "file.conf"
  }
}

config {
  # file、nacos 、apollo、zk、consul、etcd3
  type = "file"

  nacos {
    serverAddr = "localhost"
    namespace = ""
  }
  consul {
    serverAddr = "127.0.0.1:8500"
  }
  apollo {
    app.id = "seata-server"
    apollo.meta = "http://192.168.1.204:8801"
  }
  zk {
    serverAddr = "127.0.0.1:2181"
    session.timeout = 6000
    connect.timeout = 2000
  }
  etcd3 {
    serverAddr = "http://localhost:2379"
  }
  file {
    name = "file.conf"
  }
}
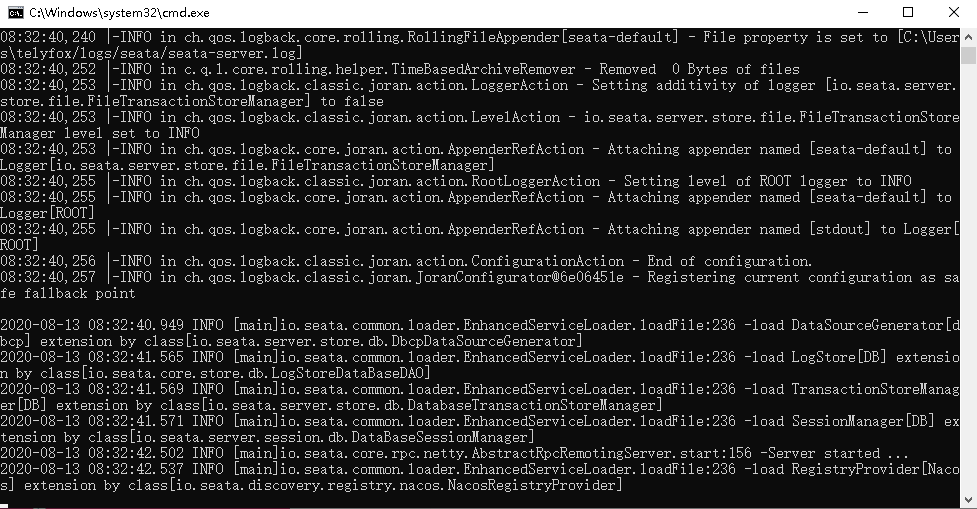
启动
先启动 Nacos
再启动 Seata
Seata 的启动文件位于 seata-server-0.9.0\seata\bin 目录下
